Jenkins CI CD Project 1
with Sonarqube, Ansible and Blue / Green deployment
I am a DevOps Consultant. 3 years experience with Cloud technologies. 9 years total IT experience in the Linux, Networking and Data Visualization domains. Love listening to music and playing older PC games.
Objectives
Build the code using Jenkins
Integrate Sonar
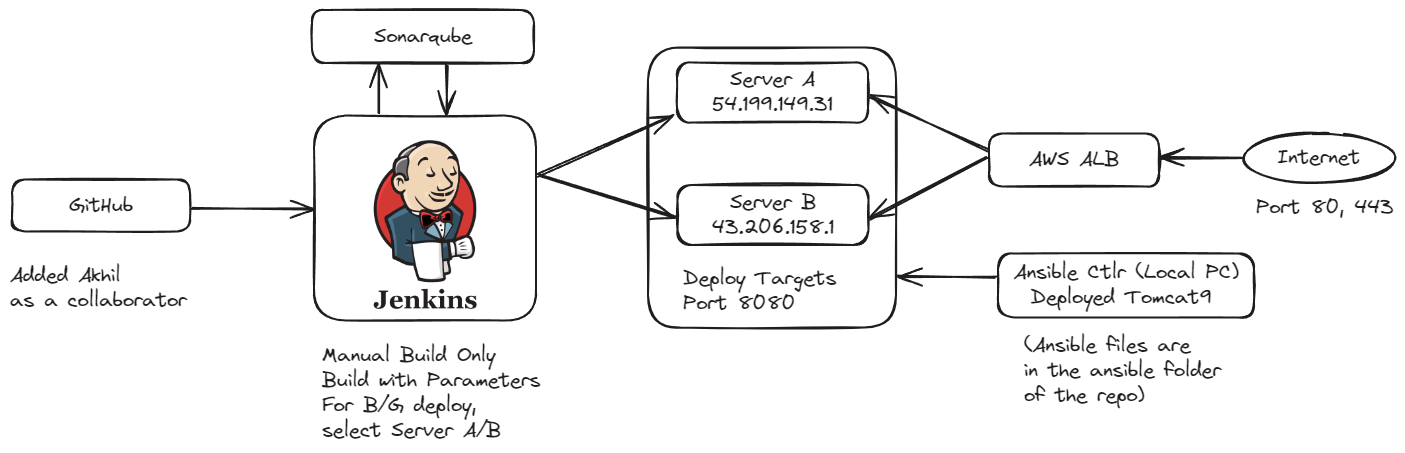
Deploy the generated artifact to two EC2 instances.
The two EC2 instances should have Apache Tomcat installed using Ansible.
Load balance the traffic to two EC2 servers using load balancer.
Once the application is stable, try implementing the blue-green.
Make a change in the codebase and deploy the updated code to ONLY one of the EC2 instances.
Upon deployment, your load balancer should serve from both the EC2 instances and show your updated page when refreshed (randomly)
Github Repo
https://github.com/melvincv/java-basic-practice-app
Steps
Jenkins Setup
Start an EC2 instance with the following parameters:
name: jenkins-aio
ami: Ubuntu 22.04 LTS 64 bit
type: t3.small
security group: open ports 80, 443, 22
spot instance: true
user data: (check and modify shell script variables first)
https://github.com/melvincv/java-basic-practice-app/blob/main/scripts/install-jenkins.sh
The script installs openjdk 17, maven 3.9.6, Jenkins from the official repos, Docker, Ansible and Caddy reverse proxy.
Be sure to set the DNS A record to the IP address of your Jenkins instance asap.
SSH to the jenkins-aio instance, Check for instance init progress
tail -f /var/log/cloud-init-output.log
Cloud-init v. 23.4.4-0ubuntu0~22.04.1 finished at Sat, 20 Apr 2024 09:33:31
and lookup your domain name. Confirm that it is pointing to your instance before starting the Caddy service.
nslookup jenkins.aws.melvincv.com
sudo systemctl start caddy
ubuntu@jenkins-aio:~$ sudo systemctl status caddy
● caddy.service - Caddy
     Loaded: loaded (/lib/systemd/system/caddy.service; enabled; vendor preset: enabled)
     Active: active (running) since Fri 2024-04-19 05:57:00 UTC; 1 day 3h ago

{"level":"info","ts":1713506223.091408,"logger":"tls.obtain","msg":"certificate obtained successfully","identifier":"jenkin>
At this point, Jenkins will be available on your domain with Let's Encrypt SSL.
Eg: https://jenkins.aws.melvincv.com/
Fill in the Admin password:
sudo cat /var/lib/jenkins/secrets/initialAdminPassword
Install Suggested Plugins
Create an Admin User and Log In
Adding Tools
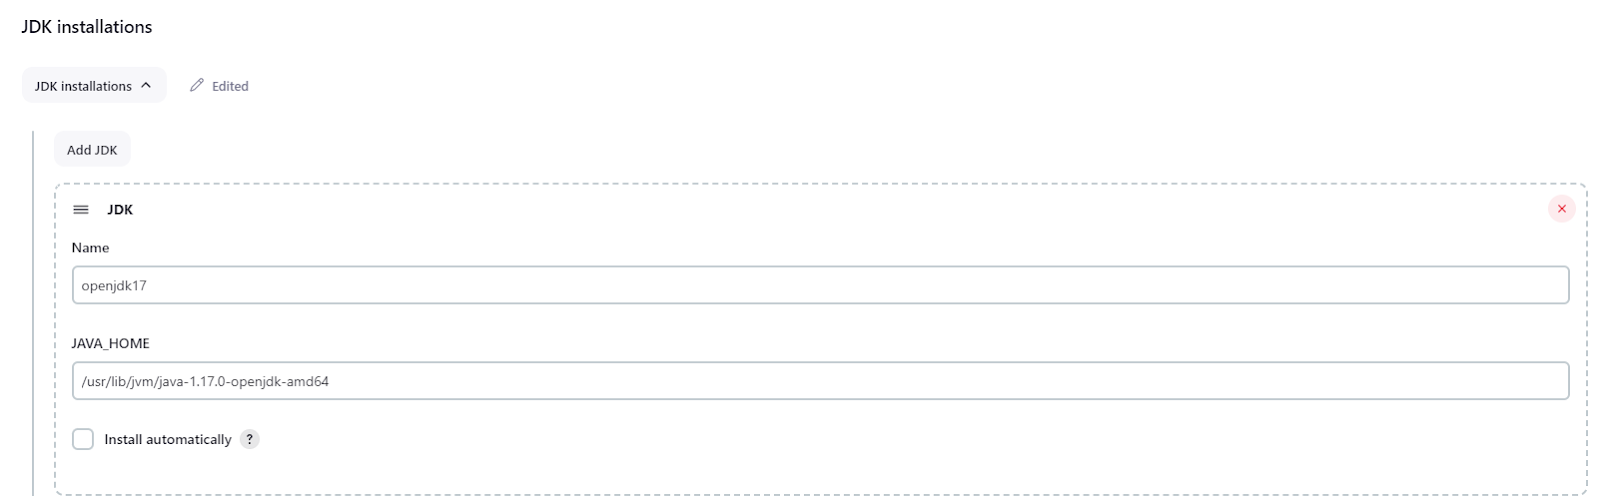
Now, you may configure the Tools section.
Manage Jenkins > Tools > Add JDK
name: openjdk17
path: /usr/lib/jvm/java-1.17.0-openjdk-amd64
Get the path using this command:
ubuntu@jenkins-aio:~$ update-java-alternatives --list
java-1.17.0-openjdk-amd64      1711       /usr/lib/jvm/java-1.17.0-openjdk-amd64
Manage Jenkins > Tools > Add Maven
name: maven3.9
path: /opt/apache-maven
Get the path using this command: (you get the Java path too)
ubuntu@jenkins-aio:~$ mvn -v
Apache Maven 3.9.6 (bc0240f3c744dd6b6ec2920b3cd08dcc295161ae)
Maven home: /opt/apache-maven
Java version: 17.0.10, vendor: Private Build, runtime: /usr/lib/jvm/java-17-openjdk-amd64
Adding Plugins
Add Plugins to extend the functionality of Jenkins.
Manage Jenkins > Plugins > Available
sonarqube scanner
ssh agent
Create a Pipeline Job
Dashboard > New item > give a name > Pipeline
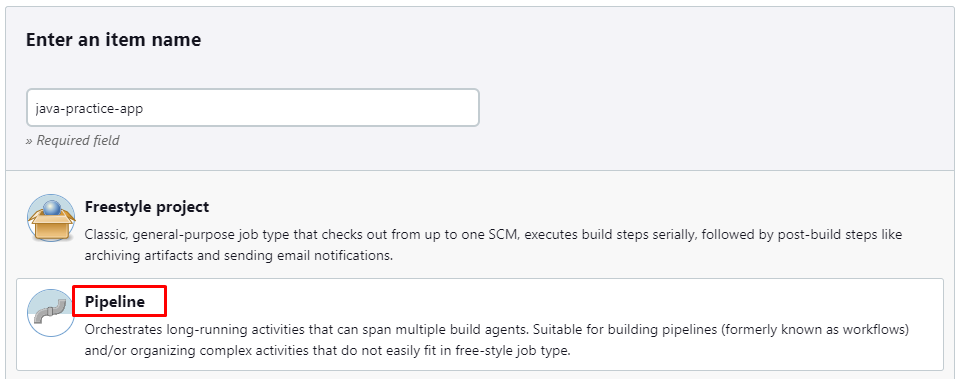
Configure section will be opened.
Pipeline > Pipeline script from SCM > Git > Enter the repo URL
Branch Specifier = */main
Save.


Sonarqube Setup
Start an EC2 instance with the following parameters:
name: sonarqube
ami: Ubuntu 22.04 LTS 64 bit
type: t3.medium
security group: open ports 80, 443, 22
spot instance: true
user data: (check and modify shell script variables first)
https://github.com/melvincv/java-basic-practice-app/blob/main/scripts/sonarqube/prereq.sh
The script configures kernel settings, installs Docker and Caddy reverse proxy.
Be sure to set the DNS A record to the IP address of your Sonarqube instance asap.
SSH to the sonarqube instance, Check for instance init progress
tail -f /var/log/cloud-init-output.log
Cloud-init v. 23.4.4-0ubuntu0~22.04.1 finished at Sat, 20 Apr 2024 09:33:31
and lookup your domain name. Confirm that it is pointing to your instance before starting the Caddy service.
nslookup jenkins.aws.melvincv.com
sudo systemctl start caddy
sudo systemctl status caddy
Check for the certificate issue, similar to Jenkins.
But Sonarqube is not ready yet and you will get an HTTP error 502 (Bad gateway). This is because the upstream server is not available - the server(s) behind the reverse proxy.
Install Sonarqube using Docker Compose
Create a folder for the Docker files
mkdir sonar; cd sonar
Create a .env file with the PostgreSQL Password
cat > .env
POSTGRES_PASSWORD=xxxxxxxxxxxxxxxxxxxx
Create a compose.yml file
My compose file: https://github.com/melvincv/java-basic-practice-app/blob/main/scripts/sonarqube/compose.yml
Start Sonarqube using Compose:
docker compose pull
docker compose up -d
The Compose file starts 3 containers:
sonarqube lts version
postgres 12
adminer (optional, for DB management)
$ docker compose ps
NAME                IMAGE                     COMMAND                  SERVICE     CREATED              STATUS              PORTS
sonar-adminer-1     adminer                   "entrypoint.sh php -..."   adminer     About a minute ago   Up About a minute   0.0.0.0:10000->8080/tcp, :::10000->8080/tcp
sonar-db-1          postgres:12               "docker-entrypoint.s..."   db          About a minute ago   Up About a minute   5432/tcp
sonar-sonarqube-1   sonarqube:lts-community   "/opt/sonarqube/dock..."   sonarqube   About a minute ago   Up About a minute   0.0.0.0:9000->9000/tcp, :::9000->9000/tcp
Wait for a minute or two...
... and Sonarqube is ready!
Eg: https://sonar.aws.melvincv.com/
Login with the default credentials and change your password ASAP.
user: admin
pass: admin
Sonarqube Integration with Jenkins
A sonarqube token is necessary for Jenkins to authenticate to your sonarqube instance.
In Sonarqube, go to Administrator > My Account > Security > Generate Token

Copy the token and add it as a Jenkins credential of type "Secret Text" with id "sonar-token"

Now add a Sonarqube Server.
Manage Jenkins > System > SonarQube servers > SonarQube installations
name: sonar
server url: https://sonar.aws.melvincv.com/
token: sonar-token (select yours)

The connection to Sonarqube is set up. After code scanning and quality gate analysis, Sonarqube needs to contact Jenkins with the stats. For this, you need a Webhook. Add a Webhook pointing to a URL on your Jenkins instance.

URL would be the IP / Domain of your Jenkins with /sonarqube-webhook/
Eg: https://jenkins.aws.melvincv.com/sonarqube-webhook/
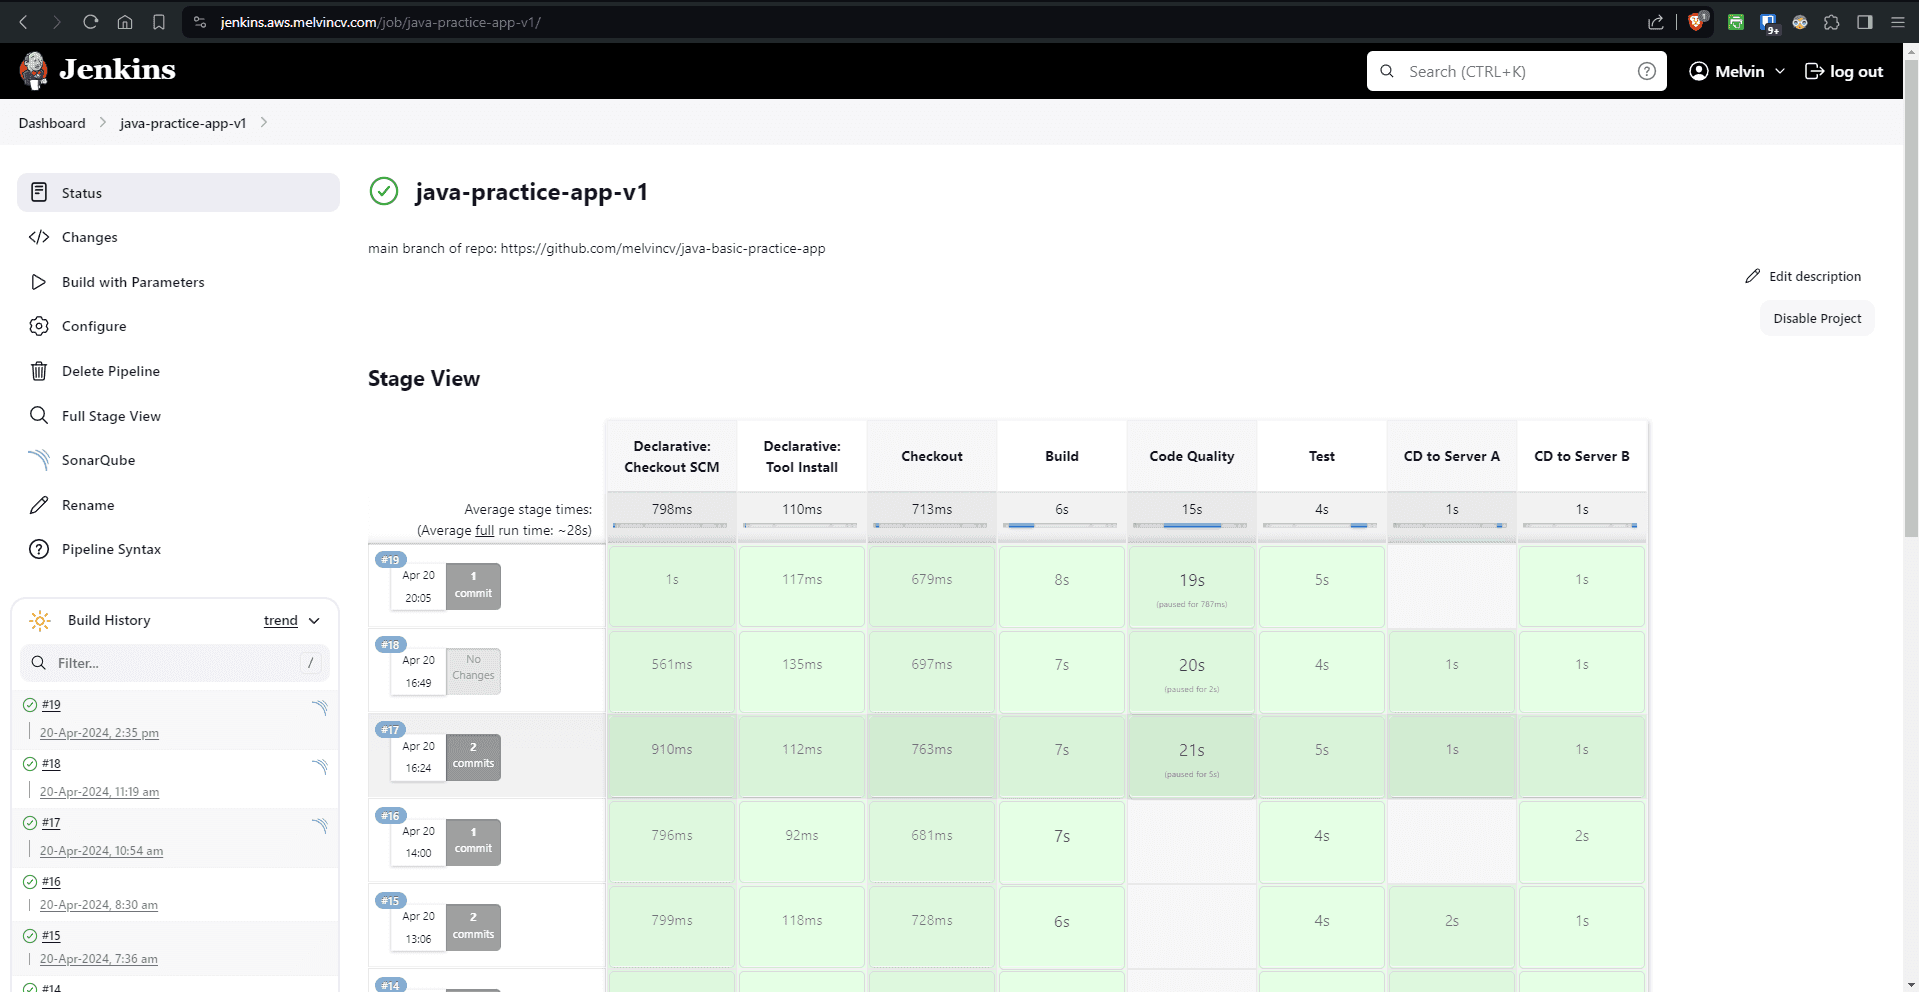
Build the Jenkins Job
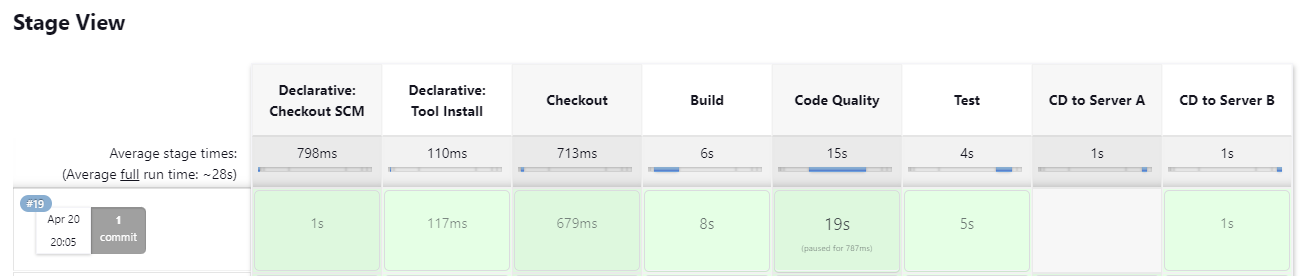
Go to the Jenkins Pipeline and "Build with Parameters". Leave them as is and click Build. The Code Quality and Test stage should pass.
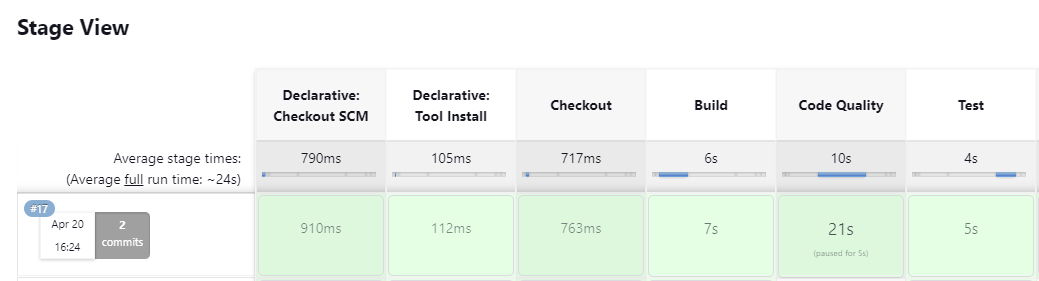
The "CD to Server" stages will fail as the servers are not ready yet.
Start and Configure the CD Servers using Ansible
Start 2 EC2 instances with the following parameters:
name: cd-target-svrA, cd-target-svrB
ami: Ubuntu 22.04 LTS 64 bit
type: t3.micro
security group: open ports 8080, 22
spot instance: true

Create an inventory file and an Ansible playbook to install Tomcat on both servers.
Refer my Ansible files: https://github.com/melvincv/java-basic-practice-app/tree/main/ansible
Set up an Ansible Controller locally and run ansible ad-hoc command to ping the servers
ansible all -i inventory.ini -m ping

Run the Ansible playbook after you get a successful ping.
ansible-playbook -i inventory.ini playbook.yml

Now you have tomcat running in both instances.
You will be able to access the default page of Tomcat using the IP and Port
Continuous Deployment using Jenkins
We had installed the SSH Agent plugin earlier.
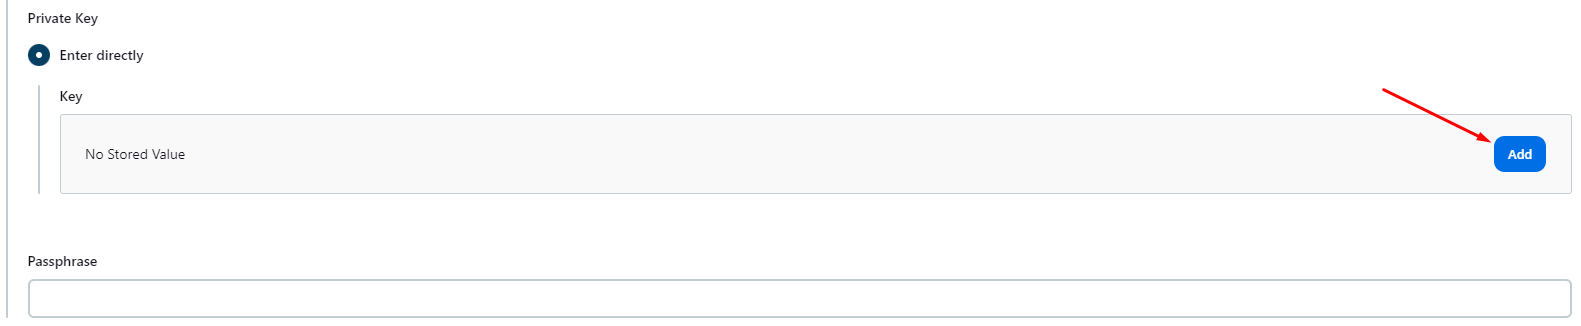
Now create a Jenkins Credential of type "SSH Username with private key". Jenkins will use this to log in to your target servers.
Set an ID and username and enter the Private Key.

Modify the Jenkins Pipeline to reflect the new ID
Stages: CD to Server A and CD to Server B
sshagent(credentials: ['akhil-p1-ssh-key'])
Run the Build with Parameters. Jenkins should now be able to deploy the WAR file to both instances.

AWS Setup
Create a Target Group
EC2 > Target Groups > Create Target Group
Basic Config > Instances
Target group name = akhil-p1
Protocol : Port = HTTP 8080
VPC: default
Protocol version: HTTP1
Health check path: /
Register targets
Add the Server A and B to the target group.


Application Load Balancer
EC2 > Load Balancers > Create > Application Load Balancer
Internet facing, IPv4, default VPC, select all subnets,
Create a Security Group
- open ports 80, 443
Listeners and routing
- select your target group
Create ALB
Get it's DNS Name: ahkil-project-1-1938854889.ap-northeast-1.elb.amazonaws.com
Blue / Green Deployment
The pipeline has many parameters that we can select at build time.
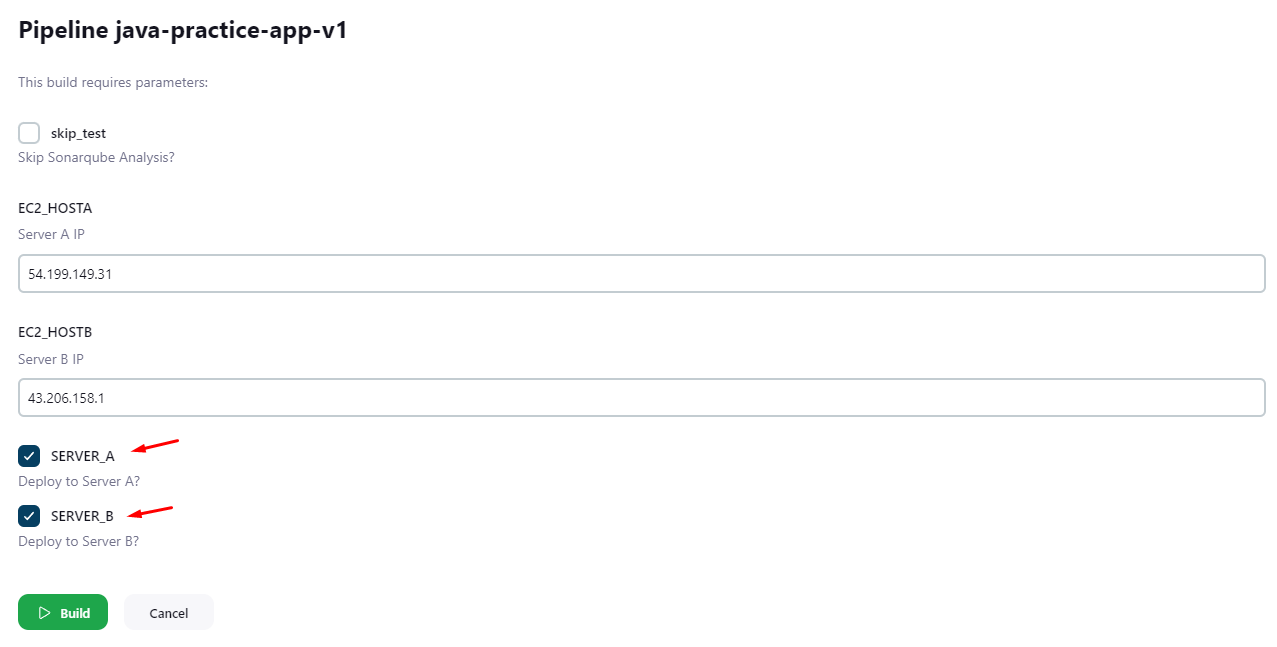
While deploying a new version of the app, you can select which server to deploy to using the check boxes for SERVER_A and SERVER_B. These are Boolean Parameters in the pipeline and are "true" by default. This will deploy the app to both servers.
To deploy it only to server B, uncheck server A.
Made a change to the "message" in src/main/java/com/akhilsharma/web/HelloController.java
Commit and Push
Build with Parameters > Select Server B Only
Now access the ALB DNS name. You can see 2 versions of the app upon refreshing the page.
SSL Setup
Route 53 > Select Zone > Create Alias record
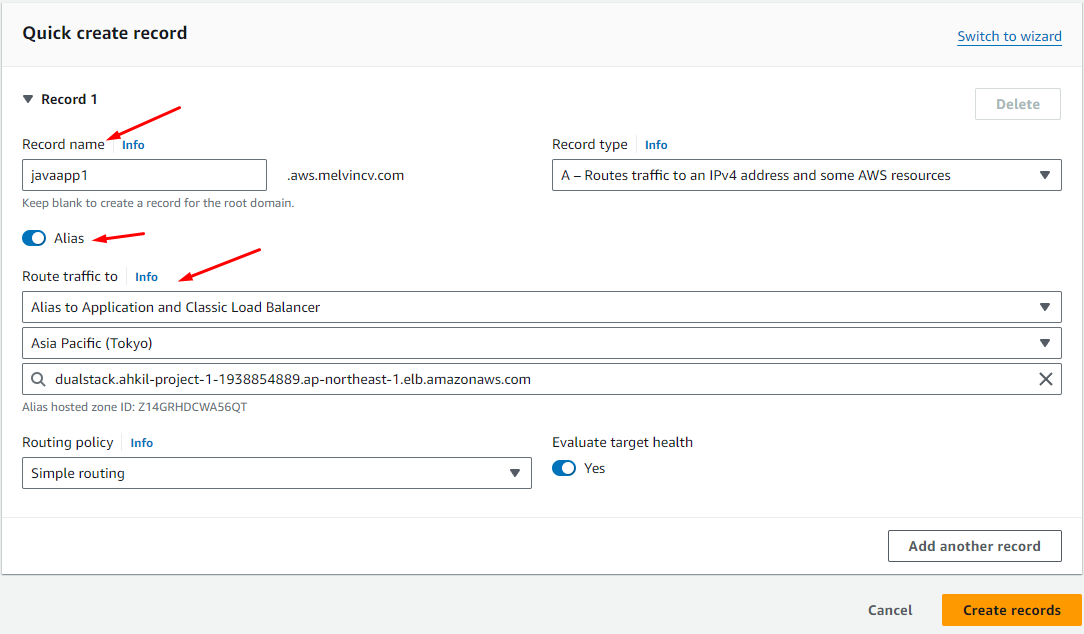
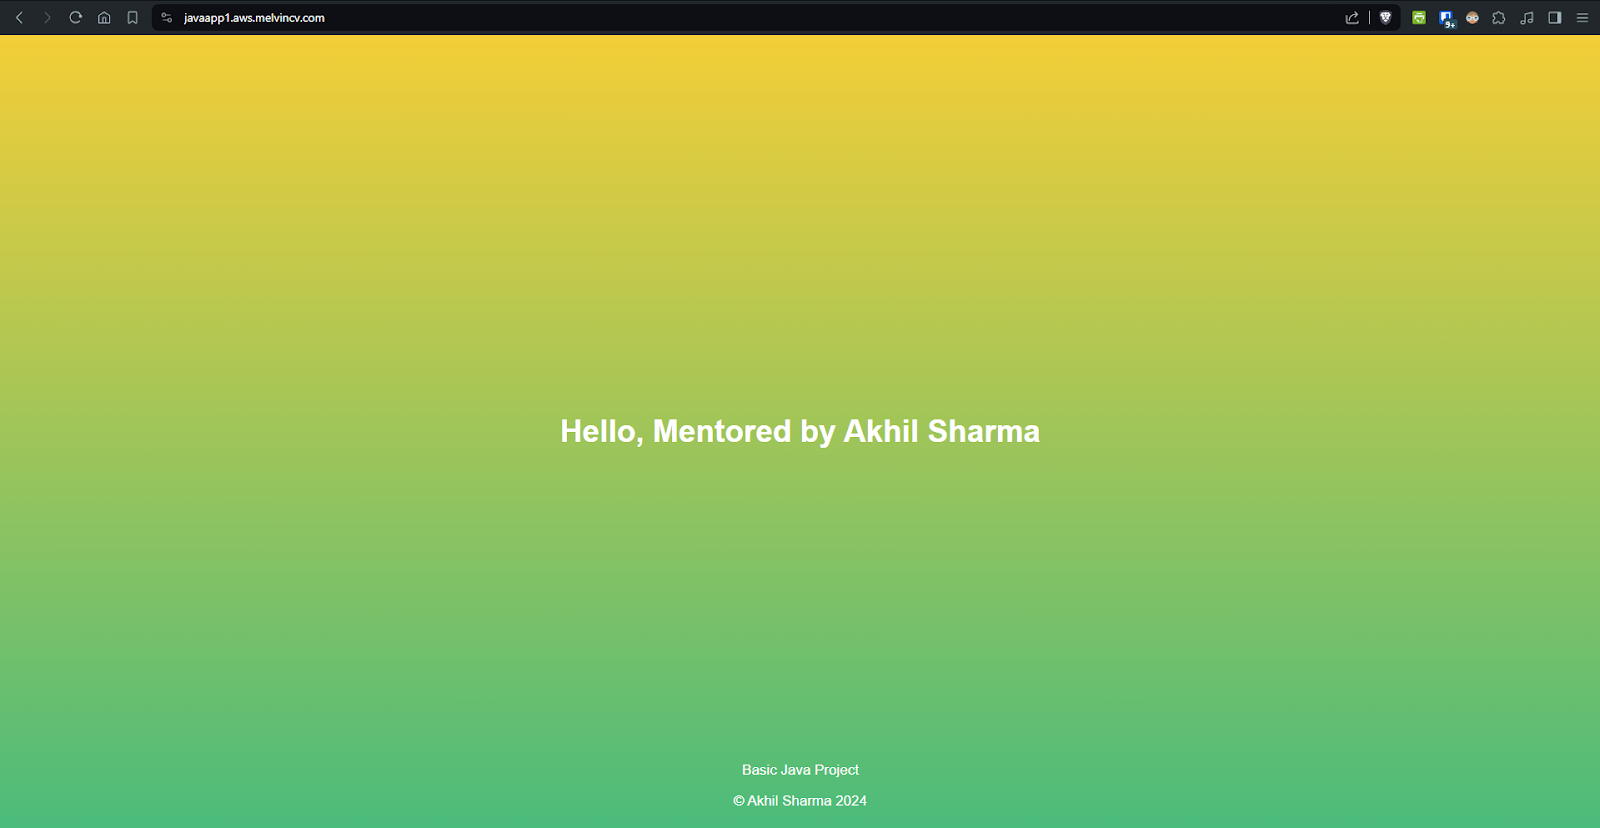
http://javaapp1.aws.melvincv.com/
Your URL is now available.
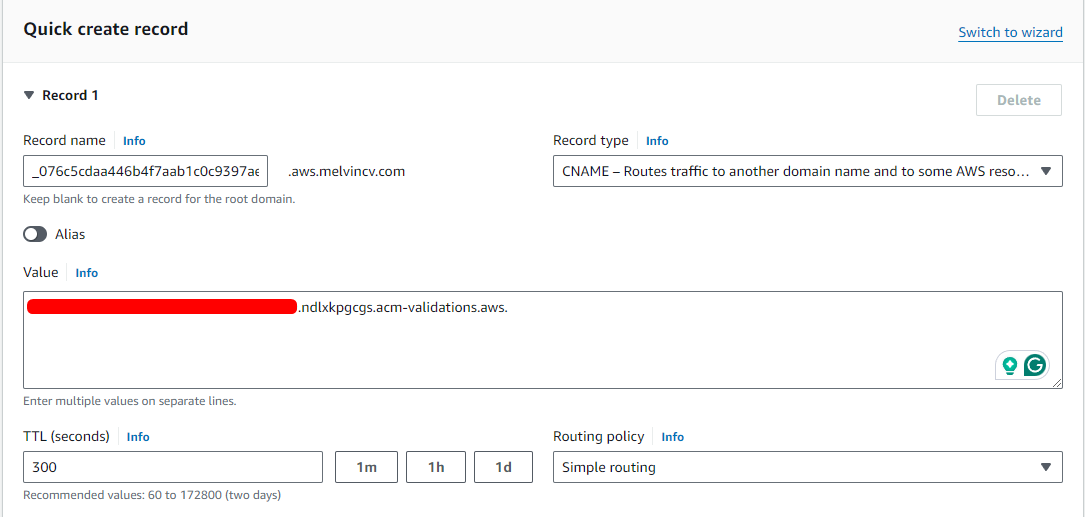
Create an SSL certificate using AWS ACM
Add a CAA Record for your zone
Amazon will not issue a certificate without this record.
Add the below value to the record. You may use issuewild or issue. issuewild is used to authorize the issue of wildcard SSL certificates.
Value:
0 issuewild "amazon.com"
0 issuewild "amazontrust.com"


AWS Certificate Manager > Request a public certificate >
FQDN: *.aws.melvincv.com
Key algorithm: RSA
Create CNAME record in Route 53 (or automatically)
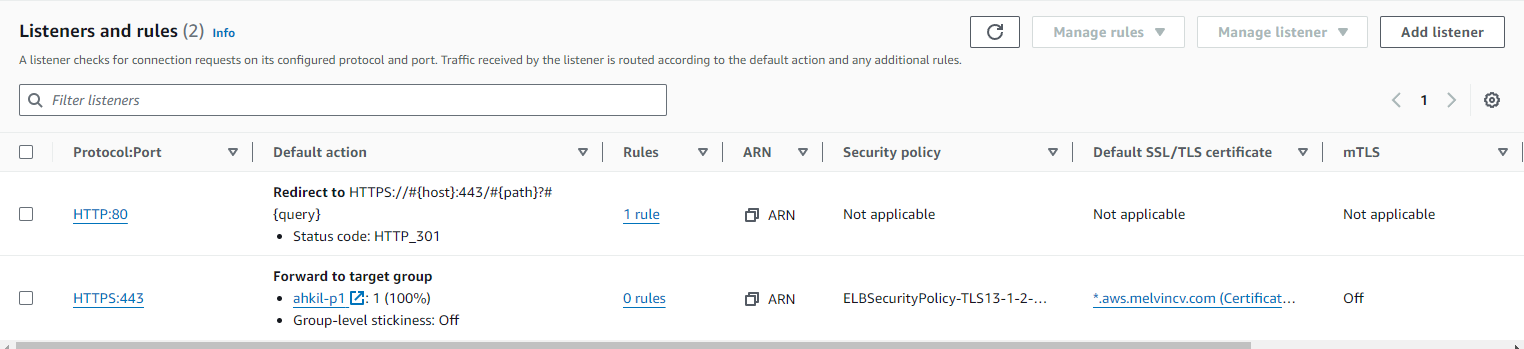
Configure App Load Balancer
EC2 > Load balancers > ahkil-project-1
Listeners and rules
Add listener > HTTPS 443
Forward to target group > akhil-p1
Default SSL/TLS server certificate > *.aws.melvincv.com
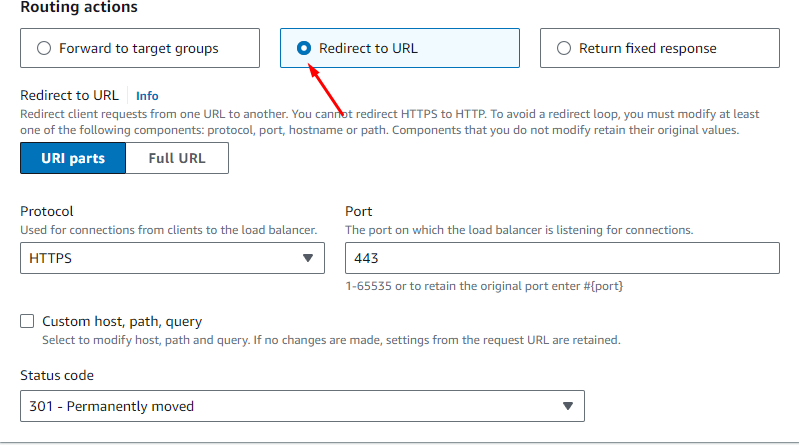
Forward HTTP to HTTPS
HTTP listener > Edit Rules
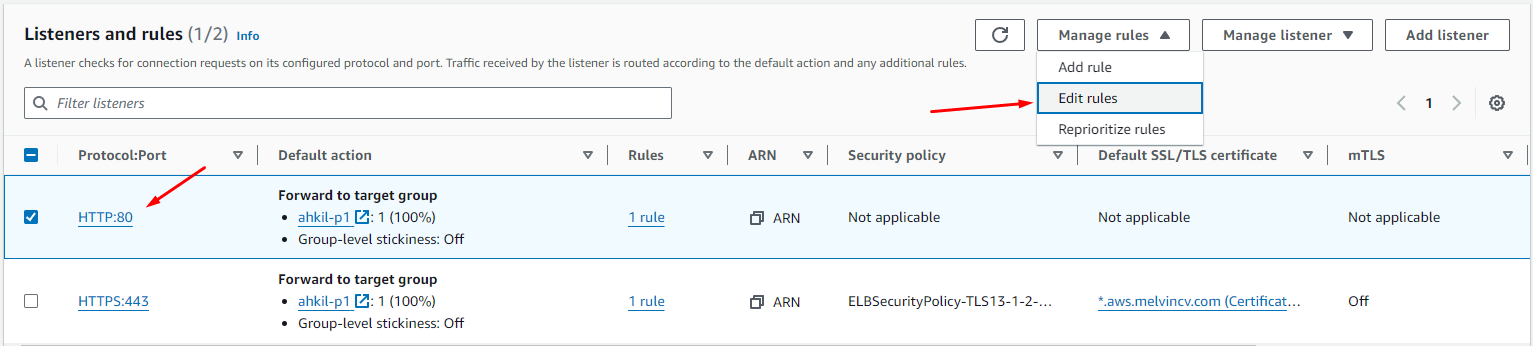
Edit Rule > Default > Redirect to URL

Results
On accessing the URL and refreshing the page, we get 2 versions of the app with different messages due to the blue/green deployment.

Jenkins Console Output
Hope you found this article useful. You are free to make modifications to this project. Linking to the original article will be much appreciated! Let me know what you think of this project in the comments!