#10weeksofCloudOps - Week 3
Implement a 2-tier architecture in AWS using Terraform.

I am a DevOps Consultant. 3 years experience with Cloud technologies. 9 years total IT experience in the Linux, Networking and Data Visualization domains. Love listening to music and playing older PC games.
Introduction
In this article, I will show you how to implement a two-tier architecture in AWS using Terraform and how to automate the deployment process using GitHub Actions.
A two-tier architecture consists of a web tier and a data tier, where the web tier handles the user interface and the data tier handles the data storage and processing.
Terraform is a tool for managing infrastructure as code, which allows you to define and provision various resources in a declarative and consistent way. GitHub Actions is a feature of GitHub that enables you to create workflows for continuous integration and continuous delivery (CI/CD) of your code.
By combining these two tools, you will be able to create a scalable and reliable architecture in AWS and deploy your code changes automatically. You can use these skills to create more complex and scalable architectures in AWS or other cloud providers. Let’s get started!
GitHub Code
melvincv/10weeksofcloudops-w3: Implement a 2 tier architecture in AWS using Terraform (github.com)
Architecture

Write a terraform block with Remote State Storage
Remote state storage in Terraform is a feature that allows you to store your Terraform state file in a remote data store instead of locally on your machine. By default, Terraform stores state locally in a file named terraform.tfstate. When working with Terraform in a team, use of a local file makes Terraform usage complicated because each user must make sure they always have the latest state data before running Terraform and make sure that nobody else runs Terraform at the same time. With remote state, Terraform writes the state data to a remote data store, which can then be shared between all members of a team.
Terraform supports storing state in various remote data stores such as Terraform Cloud, HashiCorp Consul, Amazon S3, Azure Blob Storage, Google Cloud Storage, Alibaba Cloud OSS, and more. Remote state is implemented by a backend or by Terraform Cloud, both of which you can configure in your configuration’s root module.
In your Git repo, Create a file called main.tf
terraform {
  required_version = ">= 1.4"
  backend "s3" {
    bucket = "melvincv2023-terraform-state"
    key    = "cloudops-w3/terraform.tfstate"
    region = "us-east-1"
    dynamodb_table = "cloudops-w3-terraform-state-lock"
  }
}
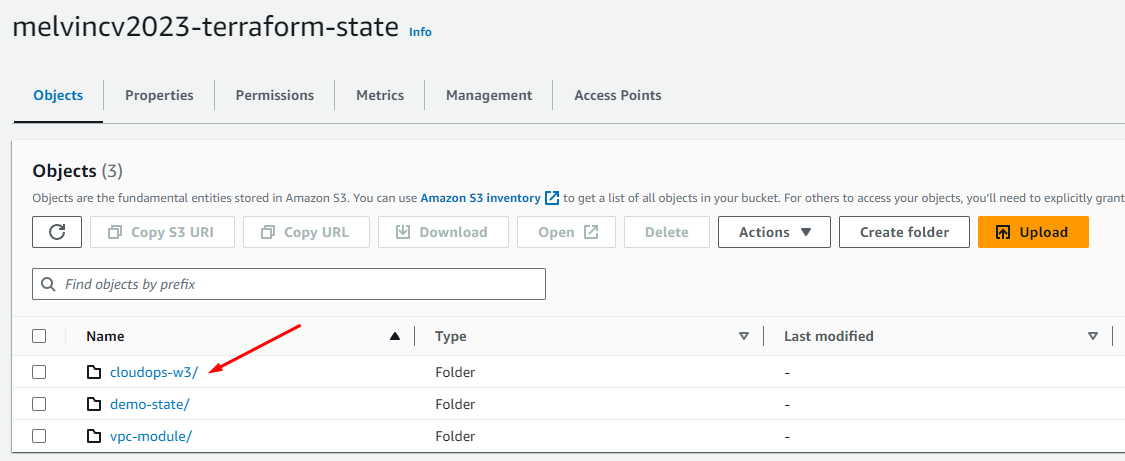
- Create an S3 bucket to store your remote state file. For me, it is called
melvincv2023-terraform-state
S3 > Buckets > Create bucket
Set a Name and Region > Public Access: Off > Create bucket.
- Create a folder (optional). I created
cloudops-w3
Select the bucket > Create Folder > Give a name > Create Folder.
Enable Versioning for the Bucket (following Terraform Best Practices)
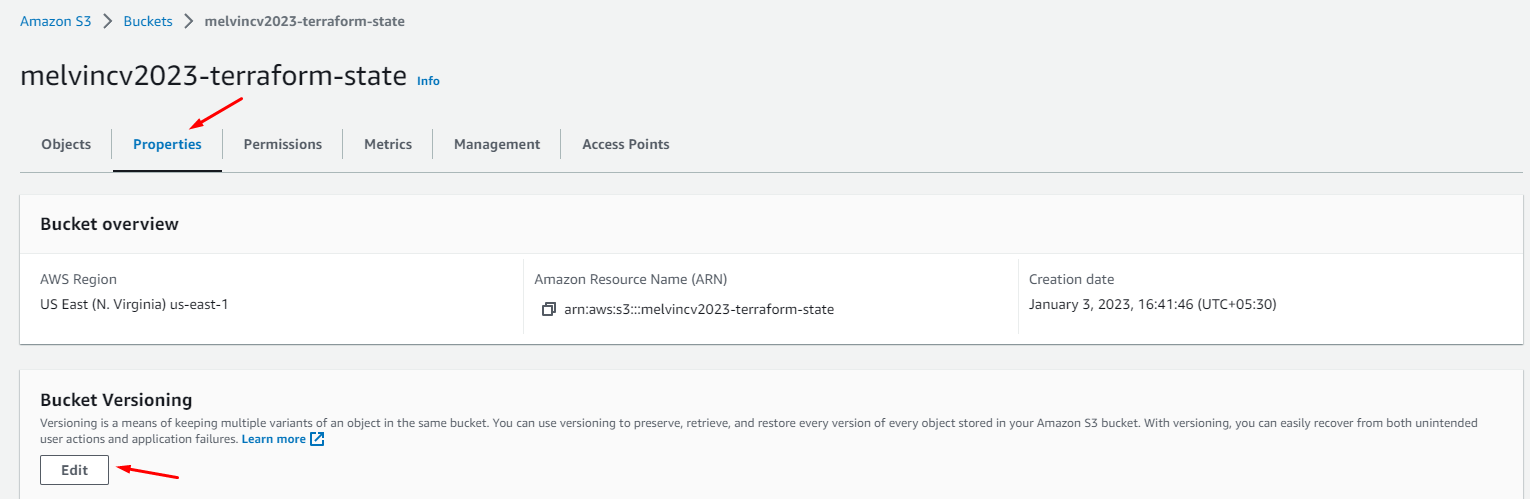
Click Enable > Save changes.

State file locking
Go to DynamoDB service > Tables > Create
Give a name cloudops-w3-terraform-state-lock > Enter LockID as a String

Table Settings > Customize settings > Table Class: DynamoDB Standard > Read/write capacity settings: On-demand > Create Table.

Create a Dynamo DB Table.
Note that State file locking will be commented in
main.tffile for now.
Create an AWS provider block
Go to this link and click on AWS
https://registry.terraform.io/browse/providers

Copy the provider's base code. Merge it with the main.tf file created earlier:
terraform {
  required_version = ">= 1.4"
  backend "s3" {
    bucket = "melvincv2023-terraform-state"
    key    = "cloudops-w3/terraform.tfstate"
    region = "us-east-1"
    dynamodb_table = "cloudops-w3-terraform-state-lock"
  }
  required_providers {
    aws = {
      source = "hashicorp/aws"
      version = "5.13.1"
    }
  }
}

provider "aws" {
  # Configuration options
}
Go to the documentation for the aws provider...
https://registry.terraform.io/providers/hashicorp/aws/latest/docs
Add required attributes:
provider "aws" {
  # Configuration options
  region = "ap-southeast-1"
  profile = "terraform-user-desktop"
}
Note that the line
profile = "terraform-user-desktop"has been commented in the repo when I enabled GitOps using GitHub Actions.
Create an IAM user for Terraform
Create an IAM user in AWS for Terraform and give it AdministratorAccess permission:
IAM > Users > Create User > Give a name (terraform-user-desktop)
Attach policies directly > AdministratorAccess > Next > Create

Click the newly created user > Security Credentials > Create Access Key

Click CLI > Tick the option "I understand the above recommendation and want to proceed to create an access key." > Next > Create Access Key.
Download and save the CSV file in a safe place
Create an AWS CLI profile
An AWS CLI profile is a named set of configuration settings and credentials that you can use to interact with AWS services from the command line. Each profile consists of a set of key-value pairs that define the following settings:
AWS access key ID: The access key ID for your AWS user or role.
AWS secret access key: The secret access key for your AWS user or role.
AWS session token: The session token for your temporary security credentials (if applicable).
AWS region: The default region for your AWS services.
Output format: The default output format for your AWS CLI commands.
You can create multiple profiles in your AWS CLI configuration file (~/.aws/config) and credentials file (~/.aws/credentials) to manage different sets of credentials and settings for different environments or use cases. You can also specify which profile to use when running an AWS CLI command by using the --profile option or setting the AWS_PROFILE environment variable.
From your local PC, install the AWS CLI for your OS.
Open a terminal and type
aws configure --profile terraform-user-desktop
Open the CSV file and copy the Access Key ID and paste it when prompted. Do the same for the Secret Access Key.
$ aws configure --profile terraform-user-desktop
AWS Access Key ID [None]: AKI*********
AWS Secret Access Key [None]: ***********
Default region name [None]: ap-southeast-1
Default output format [None]:
Now Terraform will be able to use the profile terraform-user-desktop
Initialize Terraform
Save the file main.tf > cd to the folder containing the file > run terraform init
$ cd cloudops-w3
$ terraform init

Initializing the backend...

Successfully configured the backend "s3"! Terraform will automatically
use this backend unless the backend configuration changes.
...
Create a VPC Module
One of the features of Terraform is the ability to use modules, which are reusable blocks of code that can be invoked from different configurations. Modules can be sourced from different locations, such as the Terraform Registry, GitHub, or local directories.
Local modules are useful for several reasons:
They allow you to organize your code into smaller and more manageable units.
They enable you to reuse common functionality across multiple configurations.
They help you avoid duplication and inconsistency in your code.
They make your code more modular and maintainable.
Here is the code: 10weeksofcloudops-w3/modules/vpc at main · melvincv/10weeksofcloudops-w3 (github.com)
We create 3 files: main.tf , variables.tf and outputs.tf
main.tf contains the resource blocks used to create the individual resources in the VPC.
variables.tf contains the input variables [here, without any default values]
outputs.tf contains the outputs that can be referenced in our project.
A module block is used to call the module in the main.tf file of our project.
Add a .gitignoew file to the repo root to exclude the .terraform folder and state file. The folder contains the providers and state file that may have secrets in it. So it is a good idea to exclude them before committing any code to the repo.
Commit the .gitignore file first.
# Local .terraform directories
**/.terraform*
Project files
We will build the main project in the folder cloudops-w3. You may name it as you wish, but make sure that Terraform commands are run from that folder and that you have excluded the .terraform folder.
Here is the code: 10weeksofcloudops-w3/cloudops-w3 at main · melvincv/10weeksofcloudops-w3 (github.com)
Here we have the following files:
cloudops-w3/main.tffile contains theterraform block
aws provider block
module block to call the local
vpcmodule
cloudops-w3/variables.tffile contains the input variables to the vpc modulecloudops-w3/terraform.tfvarsfile contains the actual values of the variables.cloudops-w3/outputs.tffile contains the output values for the created resources. This will be displayed afterterraform applycompletes.cloudops-w3/security-groups.tffile that has all the security groups for this project.cloudops-w3/ec2-instances.tffile that has a AMI data source block, theaws_key_pairblock to import my public key to ec2,aws_instanceblocks that will create ec2 instances.cloudops-w3/app-lb.tffile that contains theaws_lbresource block to create an Application Load balancer.cloudops-w3/aurora-db.tffile that contains resource blocks to create a Subnet Group and an Aurora Cluster.
Have a look at the repo for more!
Here are the different parts of a resource block:
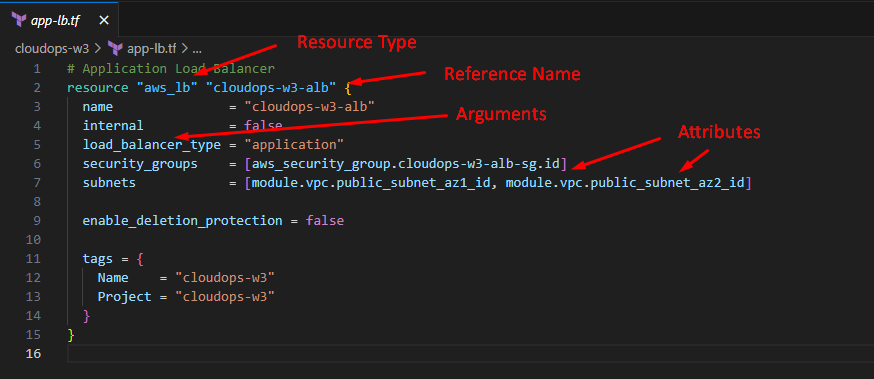
Resource type: The type of the infrastructure object you want to create or manage. For example,
aws_instance,google_compute_instance, orazurerm_virtual_machine.Reference name: A unique name that you give to the resource block. This name is used to refer to the resource block from other parts of your configuration.
Arguments: A set of key-value pairs that define the configuration of the resource. These arguments are specific to the resource type and determine how the infrastructure object is created or managed.
Attributes: A set of values that are exposed by an existing resource. You can reference these attributes from other parts of your configuration.
You may consider Arguments and Attributes to be the Input and Output values of a resource block.
main.tf explained:

Run terraform commands to initialize the repo, format and validate code and apply immediately (create resources)
In VS Code, Rt. click the project folder and "open in integrated terminal"
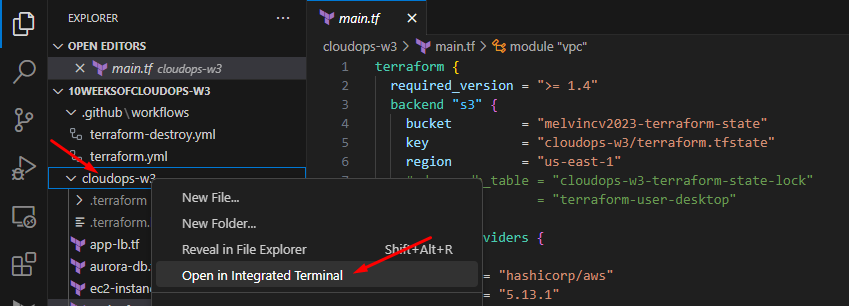
Run the following commands:
terraform init
terraform fmt
terraform validate
terraform apply
Apply would succeed and you should see the outputs.
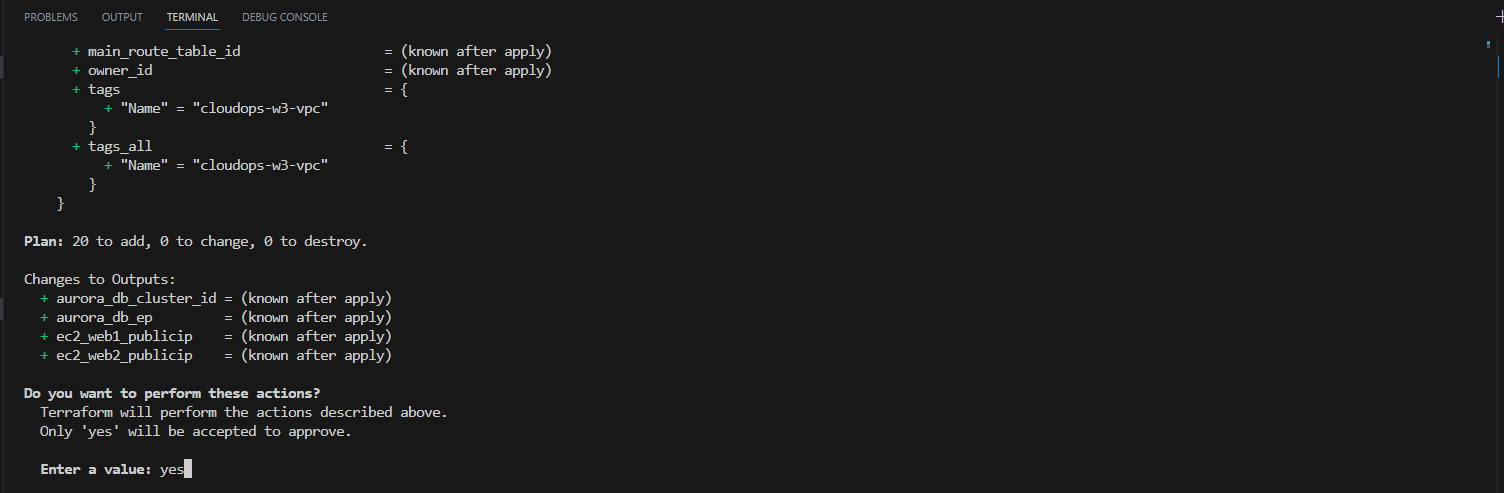

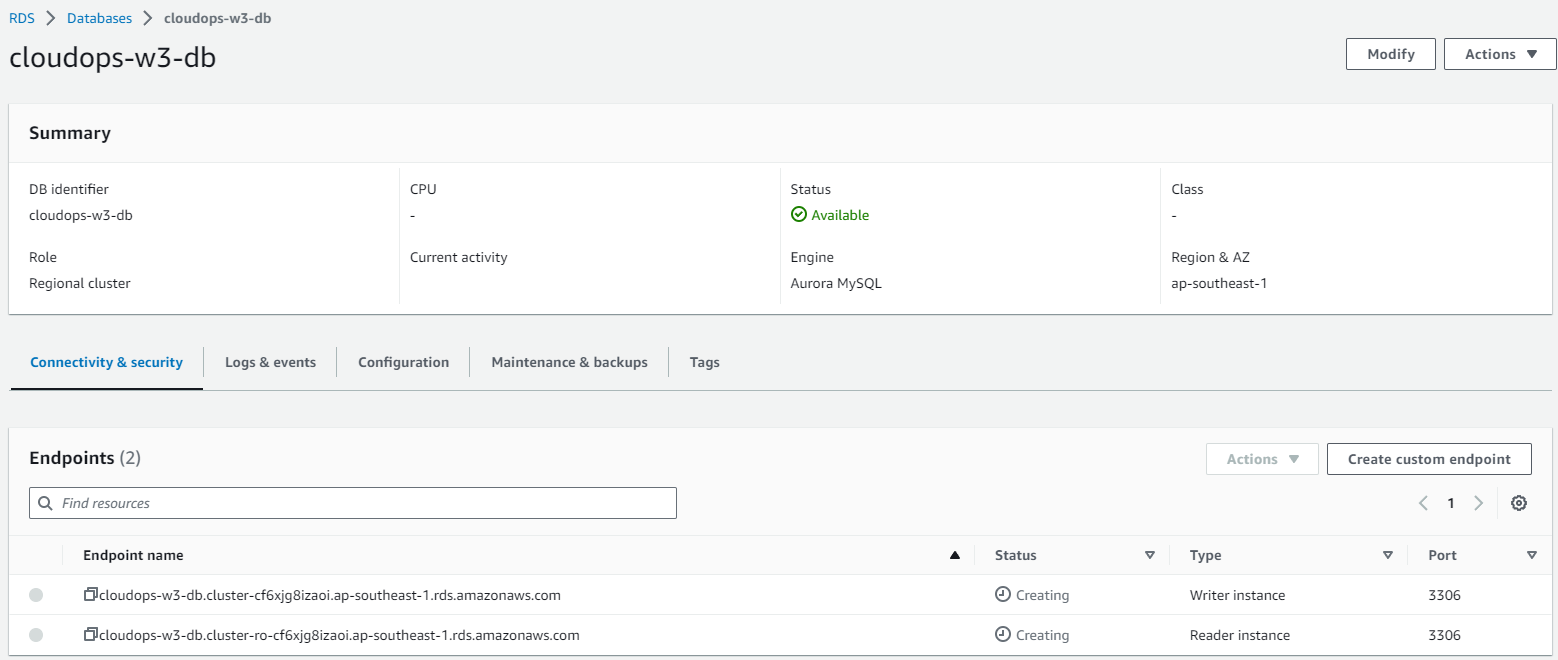
Output: Resources on AWS
VPC ID: vpc-0fe6818101d4b8362


EC2 instances:

App Load Balancer:

Security Groups:

Aurora DB cluster:

GitHub Actions
Add a GitHub Workflow:
Save it as .github/workflows/terraform.yml
I have written another workflow to DESTROY the infra from Github itself. It will only run manually: .github/workflows/terraform-destroy.yml
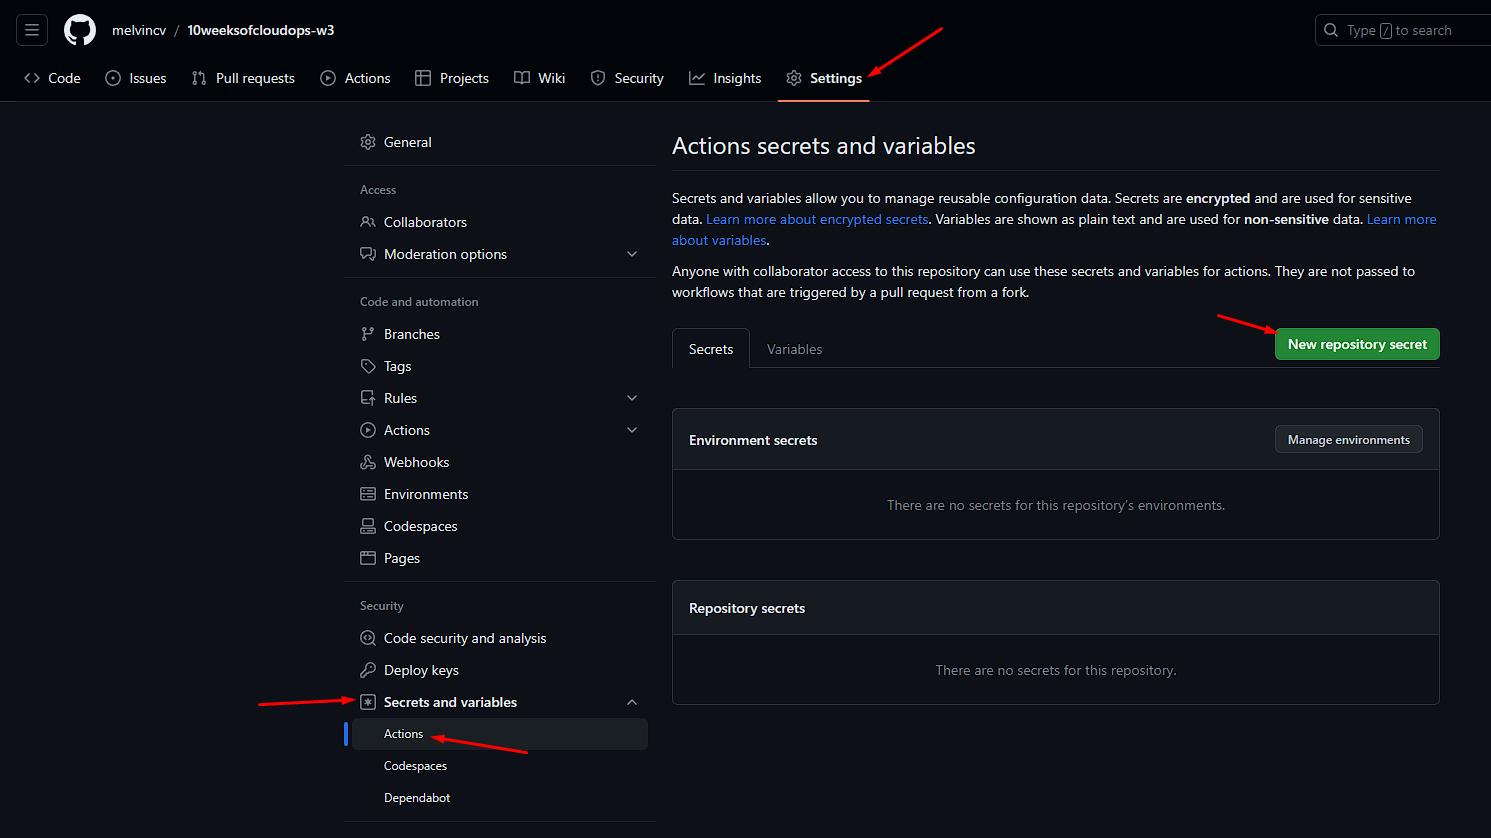
Add environment variables as Github Secrets:

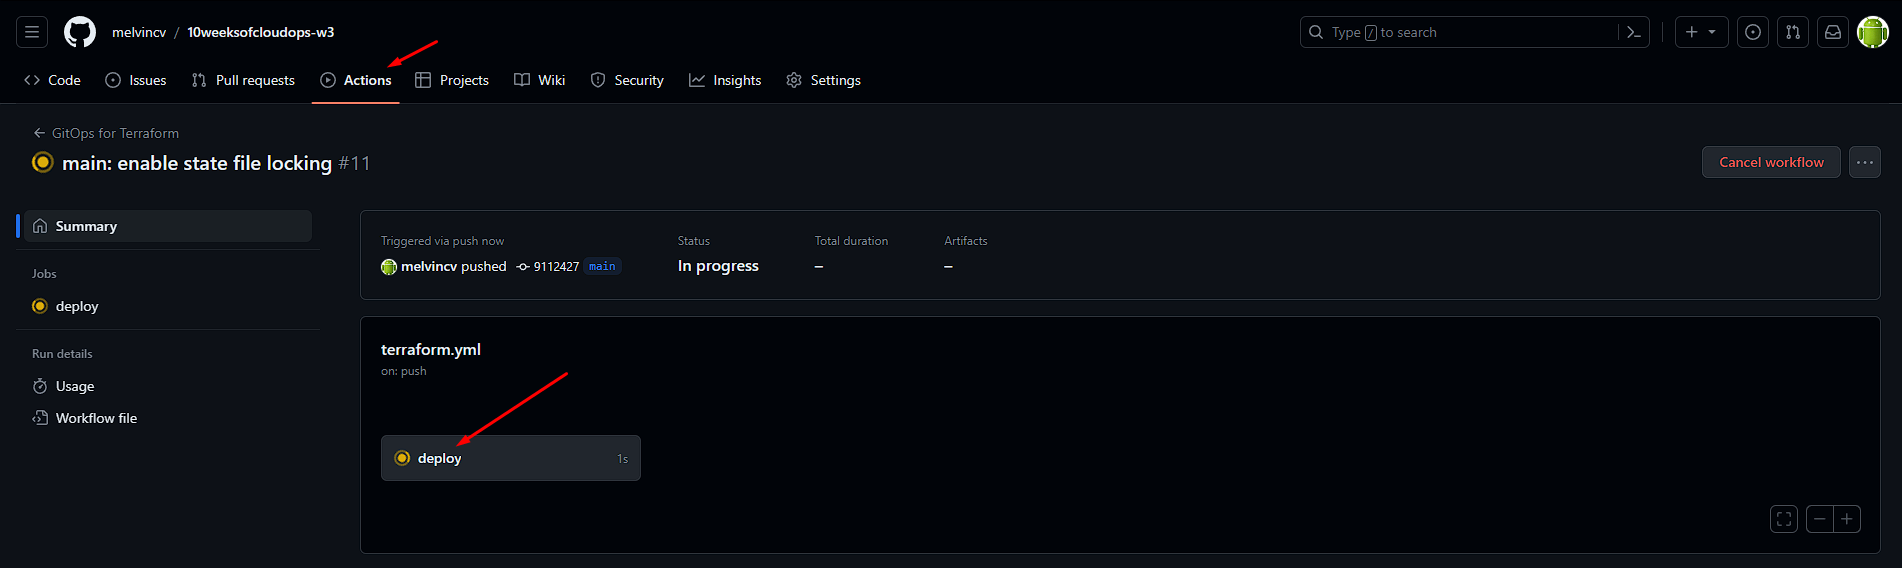
Push to the main branch or manually trigger the workflow from the Github web UI.
Uncommenting the line in main.tf to enable state file locking:
dynamodb_table = "cloudops-w3-terraform-state-lock"
Ensure that the DynamoDB table is created in the same region as the backend s3 bucket:
us-east-1
Commit and push changes.

Running terraform destroy
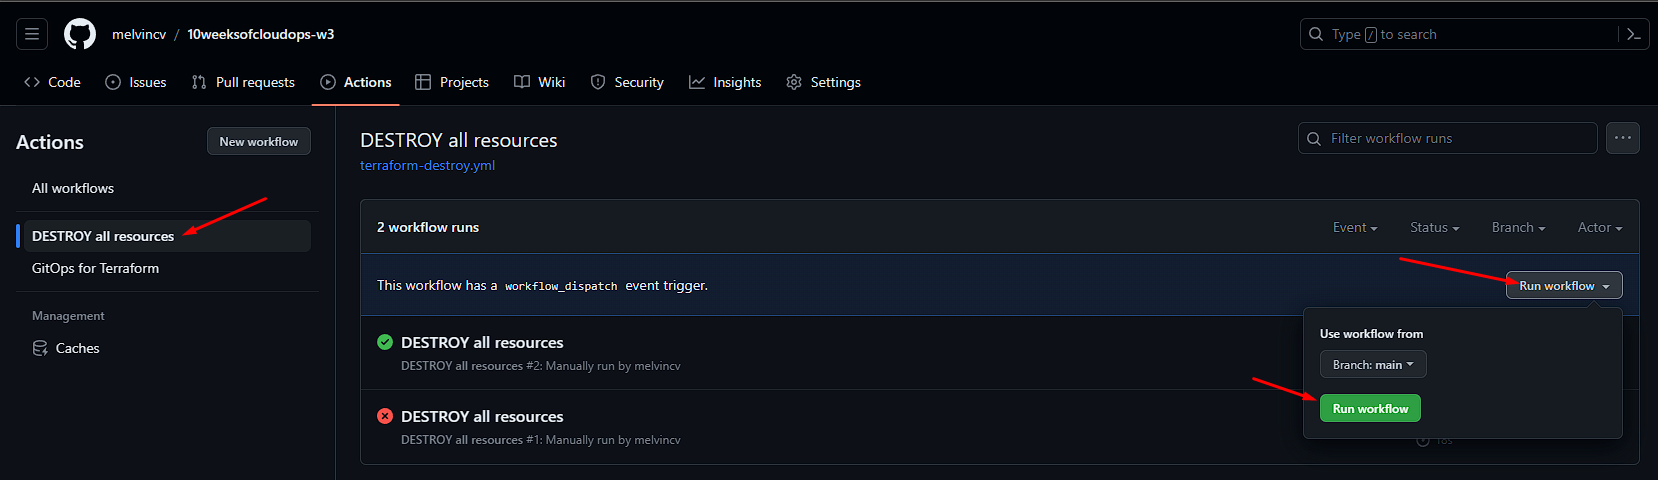
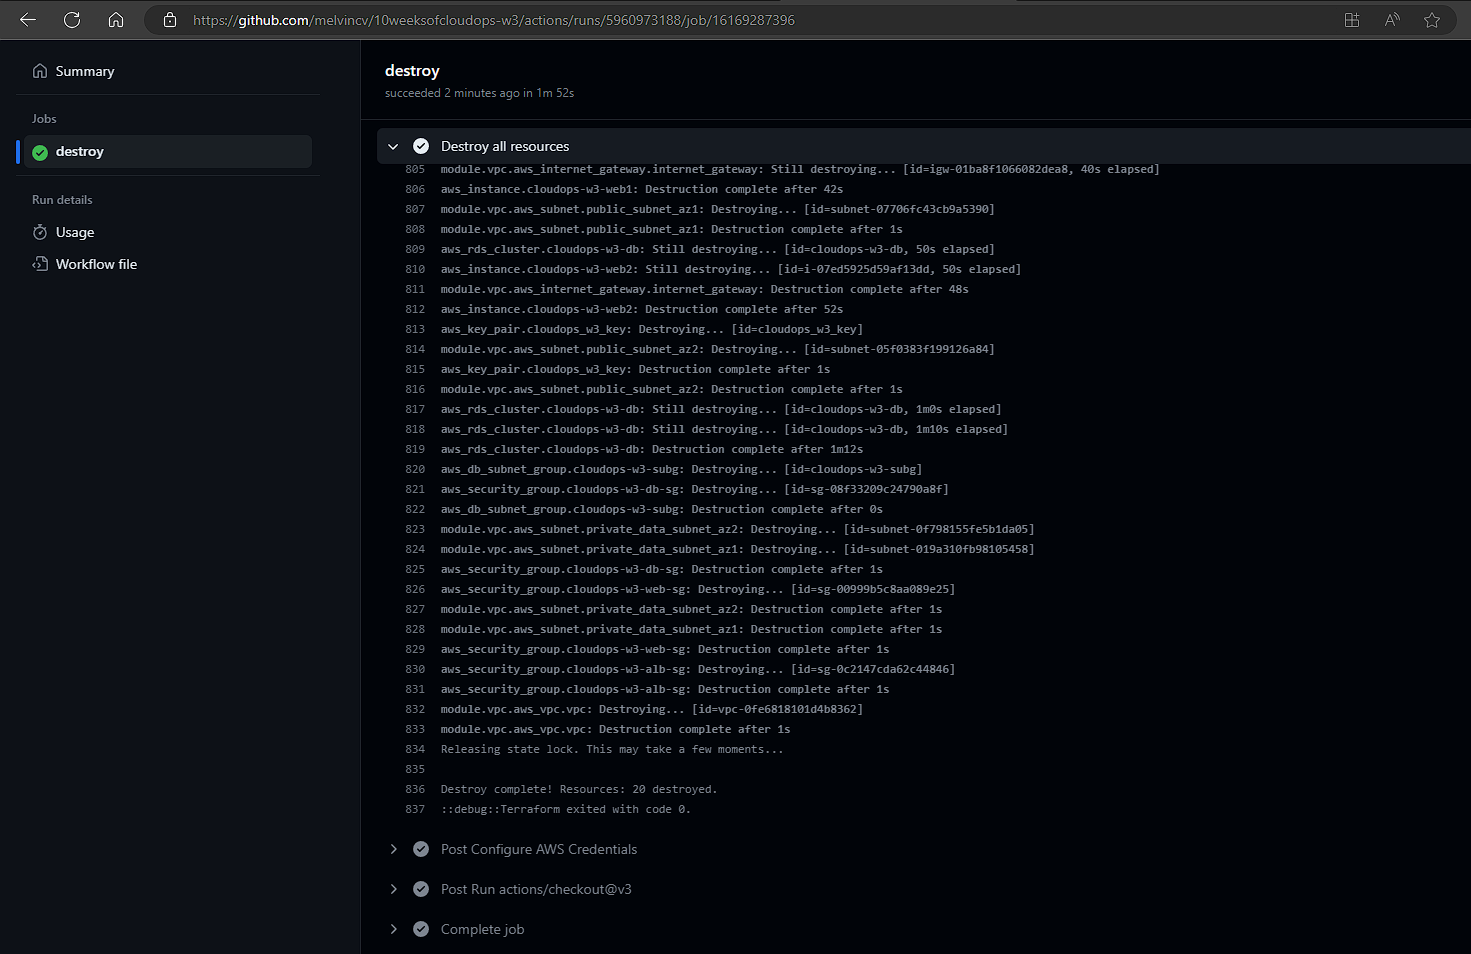
Remember to run this from the terminal if you are following this tutorial without Github Actions to avoid incurring high charges: terraform destroy
Conclusion
In this article, you learned how to implement a two-tier architecture in AWS using Terraform and how to automate the deployment process using GitHub Actions.
By following this article, you gained hands-on experience with Terraform and GitHub Actions, two powerful tools for cloud infrastructure automation. You also learned some best practices for writing modular and reusable Terraform code, managing remote state files, and implementing CI/CD pipelines. You may use these skills to create more complex and scalable architectures in AWS or other cloud providers.
If you enjoyed reading this article and want to learn more about cloud infrastructure automation, please subscribe to my blog for more updates and tutorials. You can also connect with me on LinkedIn to share your feedback and ideas. Thank you for reading!