I am a DevOps Consultant. 3 years experience with Cloud technologies. 9 years total IT experience in the Linux, Networking and Data Visualization domains. Love listening to music and playing older PC games.

Introduction
In the dynamic landscape of cloud computing, designing a highly available architecture is paramount to ensuring uninterrupted performance and user experience. This becomes even more crucial for modern applications like Node.js apps, where responsiveness and reliability are essential.
Within the intricate web of Amazon Web Services (AWS), a resilient 3-tier architecture comes to life, seamlessly integrating frontend public subnets, backend private subnets, and Aurora DB private subnets. This design ensures secure data handling, efficient traffic management, and continuous availability for Node.js applications.
Architecture

GitHub Repo
melvincv/10weeksofcloudops-w2: #10weeksofcloudops challenge - Week 2 (github.com)
Procedure
Create an S3 Bucket
Got to the S3 service > Buckets > Create Bucket.

Block Public Access should be on.
Click Create Bucket
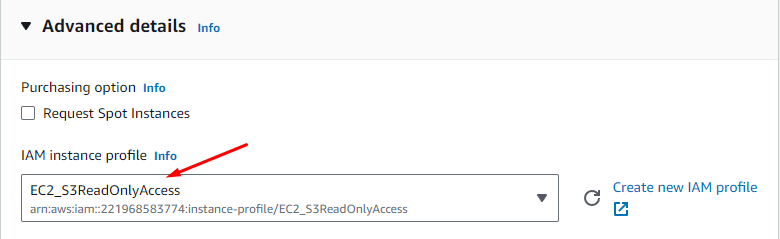
Create an IAM Role
Go to the IAM service > Roles > Create role

Next > Add Permissions to the Role:
AmazonSSMManagedInstanceCore
AmazonS3ReadOnlyAccess


Verify that the correct permissions are added:

Click Create Role
Create a Custom VPC
Go to the 'VPC' service and select a region of your choice.
Create VPC > Name: cloudops-week2
CIDR Block: 10.0.0.0/16


Create public and private subnets

The first pair of subnets, Public / Web, will be accessible from the Internet and contain web tier ec2 instances, load balancers and NAT gateways.
The App pair of subnets will contain app tier ec2 instances containing a nodejs backend app.
The Data / DB pair of subnets will hold your active/passive Aurora database.
VPC > Subnets > Create Subnet > Select VPC


Create 6 subnets:
| Sl.No. | Subnet Name | Availability Zone | CIDR Value |
| 1. | web-public-1a | ap-southeast-1a | 10.0.0.0/24 |
| 2. | web-public-1b | ap-southeast-1b | 10.0.1.0/24 |
| 3. | app-private-1a | ap-southeast-1a | 10.0.2.0/24 |
| 4. | app-private-1b | ap-southeast-1b | 10.0.3.0/24 |
| 5. | db-private-1a | ap-southeast-1a | 10.0.4.0/24 |
| 6. | db-private-1b | ap-southeast-1b | 10.0.5.0/24 |

Click Create Subnet

Create an Internet Gateway
To give the web subnets in our VPC Internet access we need to create and attach an Internet Gateway.
VPC > Internet Gateways > Create


Attach to the VPC


Create NAT Gateways in Public Subnets
DELETE AFTER USE TO AVOID HIGH CHARGES
For our instances in the App layer private subnet to be able to access the Internet their traffic will need to go through a NAT Gateway. For high availability, you’ll deploy one NAT gateway in each of your public subnets.
Go to VPC > NAT Gateways > Create
Name them:
NAT GW A
NAT GW B


Click: Create NAT Gateway

Click: Create NAT Gateway

If you go to VPC > Elastic IPs, you can see that there are 2 new elastic IPs with association ID's.
DELETE AFTER USE TO AVOID HIGH CHARGES

Create Route Tables
Go to VPC > Route Tables > Create


Add a Route for 0.0.0.0/0 (All traffic except local VPC traffic) to the Internet Gateway we created earlier.


Edit Subnet Associations and add the 2 public web subnets.


Create 2 more Route Tables to route Internet traffic from the APP Subnets to the respective NAT Gateways in each Zone.
private-app-rt-1a


- Similarly, route
private-app-rt-1btoNAT GW B


Create Security Groups (SG)
Go to VPC > Security Groups > Create
- (SG 1) Create an SG named
cloudops-w2-alb-sgfor the Internet-facing Application Load Balancer


Click Create Security Group
Copy the ID of the SG to use later

- (SG 2) Create a new SG named
cloudops-w2-web-sgfor the web tier ec2 instances. Add an inbound rule that allows HTTP traffic from your internet-facing load balancer security group you created in the previous step.

Also add a rule that allows HTTP traffic from your IP.

- (SG 3) Create a new SG named
cloudops-w2-int-alb-sgfor the internal load balancer. Add an inbound rule that allows HTTP traffic from your public instance SG. This will allow traffic from Web tier instances to hit the internal load balancer.
Copy the ID of cloudops-w2-web-sg

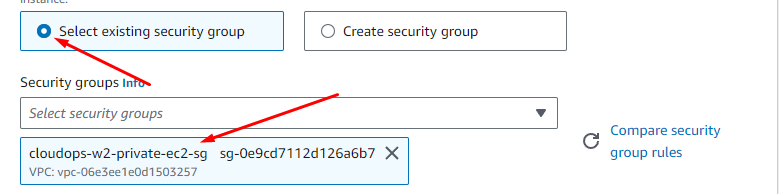
(SG 4) Create a new SG named
cloudops-w2-private-ec2-sgfor the private ec2 instances (backend).Add an inbound rule that allows TCP traffic on port 4000 from the internal load balancer SG
cloudops-w2-int-alb-sgAlso add an inbound rule that allows TCP traffic on port 4000 from your IP for testing.


(SG 5) Create a new SG named
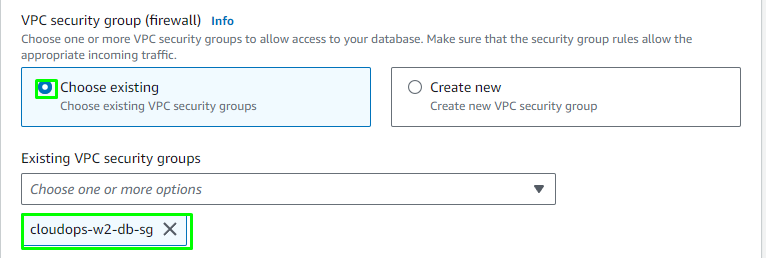
cloudops-w2-db-sgto protect our private database instances.Add an inbound rule that allows traffic from the private instance SG to the MySQL port 3306.

Verify SG creation

Create Aurora Database
DELETE AFTER USE TO AVOID HIGH CHARGES
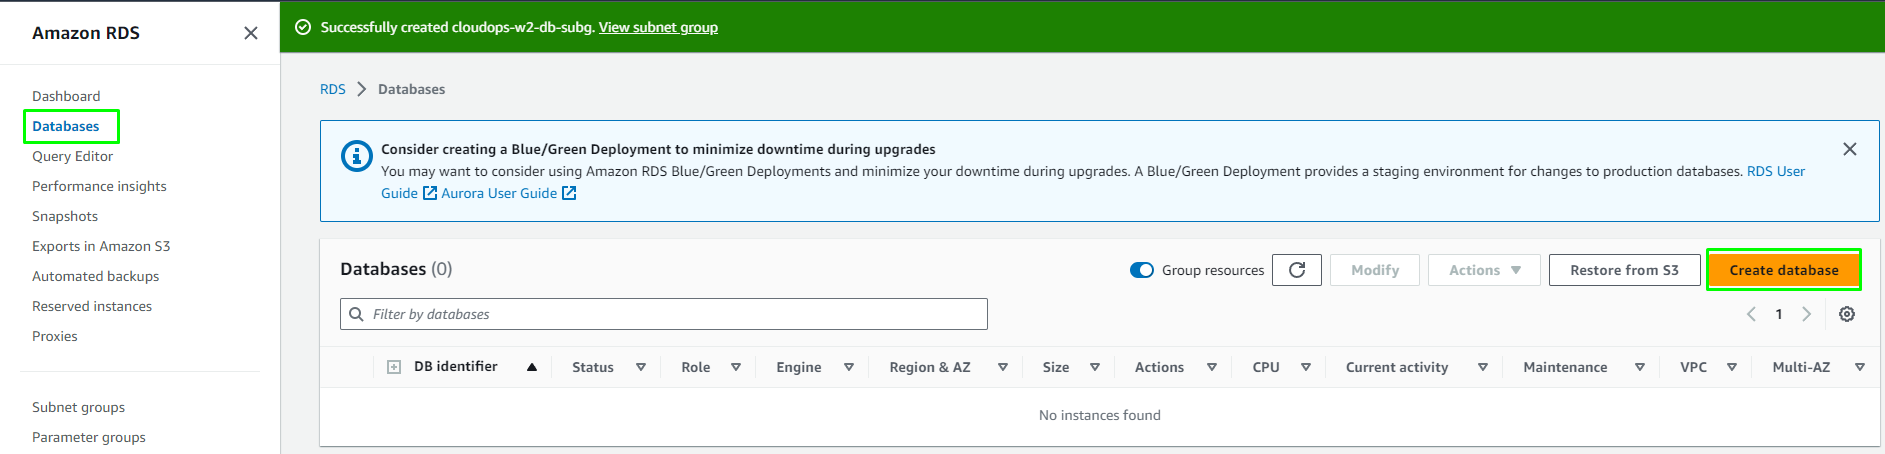
Create a Subnet Group
Go to RDS service > Subnet Groups > Create

Select the AZ's and your DB Subnets in each AZ.

Click Create

Create an Aurora Database instance


Connectivity section:


Click Create Database.
Wait for 5 min for the Aurora Cluster creation...
Click: View Credentials and copy the DB Credentials.

When your database is provisioned, you should see a reader and writer instance in the database subnets of each availability zone. Note down the writer endpoint for your database for later use.
Select the database cluster > Copy the endpoint of the Writer instance.

cloudops-w2-db.cluster-cf6xjg8izaoi.ap-southeast-1.rds.amazonaws.com
App tier instances
DELETE AFTER USE TO AVOID HIGH CHARGES
Create an EC2 instance for our app layer and make all necessary software configurations so that the app can run. The app layer consists of a Node.js application that will run on port 4000. We will also configure our database with some data and tables.
App instance
Go to the EC2 service > Instances > Launch instance.
Give a Name tag: cloudops-w2-app and tag instances, volumes and network interfaces.
Choose the Amazon Linux 2 AMI at the top for 64-bit architecture.


Save the PEM file securely.


Connect to the instance using Session Manager


you will be logged in as ssm-user which is the default user. Switch to ec2-user
sudo su - ec2-user
I did not like using this terminal. I use it only for account recovery. Instead of typing commands here, I would deploy a bastion host as below. But it is optional and you may continue with Session manager.
(Optional) Deploy a Bastion Host instance in a Public Subnet
Launch Instance >
Name: cloudops-w2-bastion
AMI: Amazon Linux 2023
Arch: 64 bit
Type: t2.micro
Key Pair: cloudops-w2

Inbound Rules > Leave the default SSH rule as is.
Launch instance.
Log in to the bastion host:
(Using Git Bash on Windows 11)
ssh -i "G:\My Drive\vault\aws\cloudops-w2.pem" ec2-user@13.212.4.194
Log in success. Now create an OpenSSH client config and save it to ~/.ssh/config
Host cloudops-w2-bastion
    HostName 13.212.4.194
    User ec2-user
    IdentityFile "G:\My Drive\vault\aws\cloudops-w2.pem"
    ForwardAgent yes
    ServerAliveInterval 60
    ServerAliveCountMax 10
Start the SSH Agent in Git Bash
add the private key (pem file) to the agent
connect to the bastion
connect to the app instance from the bastion using it's private IP
eval $(ssh-agent -s)
ssh-add "G:\My Drive\vault\aws\cloudops-w2.pem"
ssh cloudops-w2-bastion
Modify the SG of the App instance to allow SSH traffic from the Private IP of the bastion instance.

Save Rules.
Try to connect again:
$ ssh ec2-user@10.0.2.223
This time the connection is OK.
List running services to check if the AWS ssm-agent is running (optional)
$ sudo systemctl --type=service --state=running
  UNIT                            LOAD   ACTIVE SUB     DESCRIPTION
  amazon-ssm-agent.service        loaded active running amazon-ssm-agent
App tier instance configuration
Search for and Install the mariadb client [as the mysql client is no longer there]
sudo yum search mariadb
sudo yum install -y mariadb105
Launch the mariadb client and connect to the Aurora RDS DB:
[ec2-user@ip-10-0-2-223 ~]$ mysql -h cloudops-w2-db.cluster-cf6xjg8izaoi.ap-southeast-1.rds.amazonaws.com -u melvincv -p
Enter password:
Welcome to the MariaDB monitor.  Commands end with ; or \g.
Your MySQL connection id is 701
Server version: 5.7.12 MySQL Community Server (GPL)

Copyright (c) 2000, 2018, Oracle, MariaDB Corporation Ab and others.

Type 'help;' or '\h' for help. Type '\c' to clear the current input statement.

MySQL [(none)]>
Create a Database and a Table within it:
MySQL [(none)]> CREATE DATABASE webappdb;
Query OK, 1 row affected (0.015 sec)

MySQL [(none)]> SHOW DATABASES;
+--------------------+
| Database           |
+--------------------+
| information_schema |
| mysql              |
| performance_schema |
| sys                |
| webappdb           |
+--------------------+
5 rows in set (0.002 sec)

MySQL [(none)]> USE webappdb;
Database changed
MySQL [webappdb]> CREATE TABLE IF NOT EXISTS transactions(id INT NOT NULL
    -> AUTO_INCREMENT, amount DECIMAL(10,2), description
    -> VARCHAR(100), PRIMARY KEY(id));
Query OK, 0 rows affected (0.049 sec)

MySQL [webappdb]> SHOW TABLES;
+--------------------+
| Tables_in_webappdb |
+--------------------+
| transactions       |
+--------------------+
1 row in set (0.001 sec)

MySQL [webappdb]> INSERT INTO transactions (amount,description) VALUES ('400','groceries');
Query OK, 1 row affected (0.009 sec)

MySQL [webappdb]> SELECT * FROM transactions;
+----+--------+-------------+
| id | amount | description |
+----+--------+-------------+
|  1 | 400.00 | groceries   |
+----+--------+-------------+
1 row in set (0.010 sec)

MySQL [webappdb]>
Create a DB User and grant all permissions on the transactions DB to it:
MySQL [webappdb]> CREATE USER 'melvin'@'%' IDENTIFIED BY 'RZe=urGbp4<-"F4T';
Query OK, 0 rows affected (0.013 sec)

MySQL [webappdb]> GRANT ALL ON transactions.* TO 'melvin'@'%';
Query OK, 0 rows affected (0.013 sec)

MySQL [webappdb]> SELECT User,Host FROM mysql.user;
+-----------+-----------+
| User      | Host      |
+-----------+-----------+
| melvin    | %         |
| melvincv  | %         |
| mysql.sys | localhost |
| rdsadmin  | localhost |
+-----------+-----------+
4 rows in set (0.001 sec)

MySQL [webappdb]> \q
Bye
Git Repo and Code
Edit the below file in the git repo using a code editor and fill in the Aurora DB details:
application-code/app-tier/DbConfig.js

Copy the repo code to your S3 bucket.
From the repo root folder,
cd application-code
aws s3 cp . s3://melvincv2023-cloudops-w2 --recursive

install NVM
curl -o- https://raw.githubusercontent.com/nvm-sh/nvm/v0.38.0/install.sh | bash
source ~/.bashrc
Install a compatible version of nodejs and use it
nvm install 16
nvm use 16
PM2 is a daemon process manager that will keep our node.js app running when we exit the instance or if it is rebooted. Install that as well.
npm install -g pm2
Download our code from our s3 buckets onto our instance.
cd ~
aws s3 cp s3://melvincv2023-cloudops-w2/app-tier/ app-tier --recursive
Install dependencies, and start the app with pm2.
cd ~/app-tier
npm install
pm2 start index.js

Make sure the app is running corectly:
pm2 list

To start our app at boot even if the server crashes or reboots:
pm2 startup

save the current list of node processes:
pm2 save
Testing
This is our simple health check endpoint that tells us if the app is simply running.
curl http://localhost:4000/health
The response should looks like the following:
"This is the health check"
Next, test your database connection. You can do that by hitting the following endpoint locally:
curl http://localhost:4000/transaction
You should see a response containing the test data we added earlier:
{"result":[{"id":1,"amount":400,"description":"groceries"}]}
If you see both of these responses, then your networking, security, database and app configurations are correct.
Internal Load Balancing
DELETE AFTER USE TO AVOID HIGH CHARGES
An internal load balancer is a type of load balancer that distributes incoming network traffic to backend resources, such as Amazon EC2 instances, within a Virtual Private Cloud (VPC) network. Unlike external load balancers, which are accessible from the internet, internal load balancers are designed to handle traffic within the boundaries of a VPC and are not directly accessible from the public internet.
Create **Amazon Machine Image (**AMI)
An Amazon Machine Image (AMI) is a pre-configured virtual machine image used as a template to create new instances (virtual servers) in Amazon Web Services (AWS). An AMI includes the operating system, application software, and any additional configurations necessary to launch instances with specific characteristics.
Create an AMI of the App tier instance to implement AutoScaling using an Internal App Load balancer.
EC2 > Instances > Rt.Click App instance


Click: Create Image
Create a Target Group
Create a target group for the internal load balancer.
A Target Group is a logical grouping of targets, which are typically instances or IP addresses that receive incoming traffic from the load balancer. The load balancer uses the target group to determine where to direct incoming requests. It plays a crucial role in routing traffic to healthy instances while also allowing you to manage the distribution of traffic based on different rules and conditions.
EC2 > Target Groups > Create


Next
Do NOT register any targets for now.
Click: Create Target Group

EC2 > Load Balancers > Create load balancer


Click: Create Load Balancer
Create a Launch Template
Before we configure Auto Scaling, we need to create a Launch template with the AMI we created earlier.
A launch template is a resource that defines the configuration for launching instances (virtual servers). It provides a convenient way to specify the various settings needed to create and launch instances consistently, including the Amazon Machine Image (AMI), instance type, networking options, security groups, storage configurations, and more.
EC2 > Launch Templates > Create
Name the Launch Template
Select the App Tier AMI


Instance Type: t2.micro
Key pair: Don't include
Network Settings: Don't include

User Data > Add the below script
#!/bin/bash
cd ~
aws s3 sync s3://melvincv2023-cloudops-w2/app-tier/ app-tier
Click: Create Launch Template
Create Auto Scaling Group
DELETE AFTER USE TO AVOID HIGH CHARGES
An Auto Scaling group is a key feature of Amazon Web Services (AWS) that enables you to automatically scale the number of instances in a group based on demand. It helps ensure that your application can handle varying workloads and maintains availability and performance by dynamically adjusting the number of instances up or down as needed.
EC2 service > Auto Scaling groups > Create

Next

Next


Optional: Add a 'Target Scaling Policy to scale up if a certain no. of requests hit the internal load balancer:

How to set the right Target Value?
Observability and Monitoring: Use AWS CloudWatch or other monitoring tools to track metrics related to the ALB and the instances. This data can provide insights into request patterns and help you set appropriate target values.
Iterative Approach: Start with a conservative target value and monitor your application's performance. Gradually adjust the target value based on observed behavior and performance metrics.
Add Notifications if needed > Add Tags

Skip to Review > Create ASG

Create Web Tier instances
DELETE AFTER USE TO AVOID HIGH CHARGES
Edit nginx config
From the Repo root, go to app-code/nginx.conf and edit line 58 to include the DNS name of the Internal load balancer we created earlier.

Commit and upload nginx.conf and web-tier folder to the S3 bucket.
Create an EC2 instance for the web tier
EC2 > Create instance > Name: cloudops-w2-web > Type: t2.micro > Select Key Pair cloudops-w2 > Network Settings:


Launch instance.
Connect to the instance
Add this to ~/.ssh/config
Host cloudops-w2-web
    HostName 13.212.149.128
    User ec2-user
    IdentityFile "cloudops-w2.pem"
    ForwardAgent no
    ServerAliveInterval 60
    ServerAliveCountMax 10
Add an Inbound Rule to the Security Group of the Web instance that allows SSH from your IP: cloudops-w2-web-sg

Connect using openssh
ssh cloudops-w2-web
Set up the Web instance
Install npm and node 16.
curl -o- https://raw.githubusercontent.com/nvm-sh/nvm/v0.38.0/install.sh | bash
source ~/.bashrc
nvm install 16
nvm use 16
Copy the web tier code from our S3 bucket.
cd ~/
aws s3 cp s3://melvincv2023-cloudops-w2/web-tier/ web-tier --recursive
Create the build folder for the react app by building it.
cd ~/web-tier
npm install
npm run build
Install nginx...
sudo yum install -y nginx
Replace nginx.conf on the instance with our edited one from the S3 bucket.
cd /etc/nginx
sudo rm nginx.conf
sudo aws s3 cp s3://melvincv2023-cloudops-w2/nginx.conf .
Restart NGINX, see that nginx has permissions to access our files and start it on boot.
sudo service nginx restart
chmod -R 755 /home/ec2-user
sudo chkconfig nginx on
The demo website would now be available when you enter the IP address of the Web instance:

Create an AMI of the Web instance, similar to that of the App tier...


Create Image.
Create a Target Group
For balancing the load across the public Web instances.
EC2 > Target Groups > Create


Next > Create Target Group.
Create a Public Load Balancer
DELETE AFTER USE TO AVOID HIGH CHARGES
EC2 > Load Balancers > Create
Select Application Load Balancer > Create

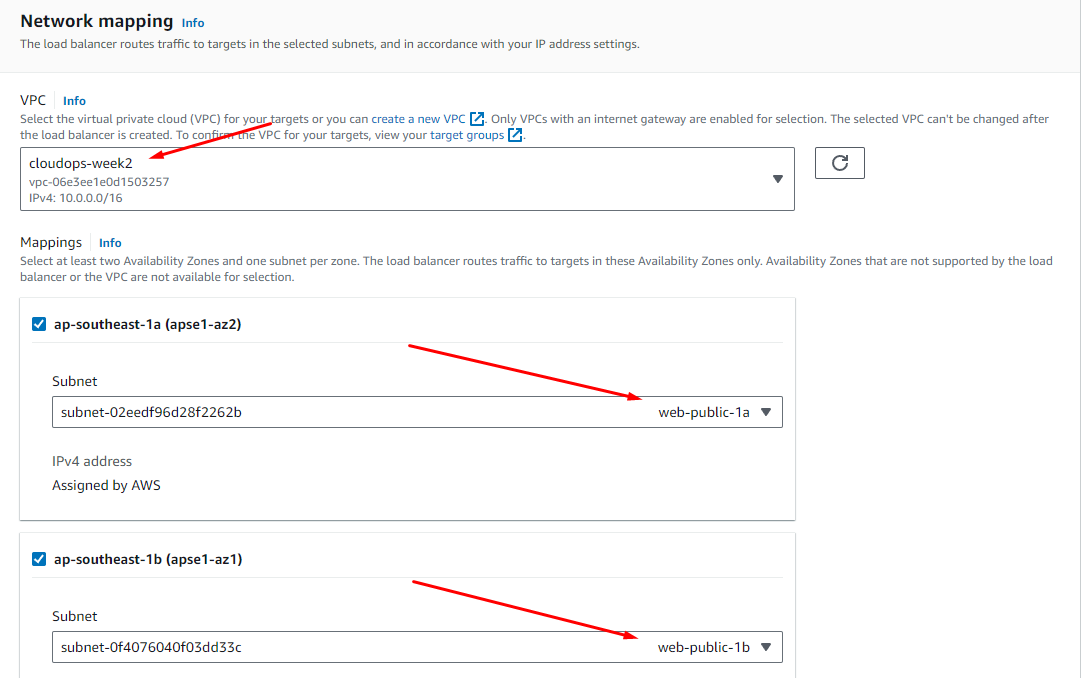


Create Load Balancer.

Create Launch Template
Create a launch template for use in Auto Scaling.
EC2 > Launch Templates > Create


User Data > Add the below script:
#!/bin/bash
cd ~
aws s3 sync s3://melvincv2023-cloudops-w2/web-tier/ web-tier
sudo aws s3 cp s3://melvincv2023-cloudops-w2/nginx.conf /etc/nginx
sudo systemctl reload nginx
Create Launch Template.
Create Auto Scaling Group
DELETE AFTER USE TO AVOID HIGH CHARGES
EC2 > Auto Scaling Groups > Create


Next

Next


Next

(Next step is optional)

Next
Add notifications (optional) > Skip to review

Create Auto Scaling Group.

Go to the App LB's Security group > Inbound Rules > Add a rule to allow HTTP traffic to all IPv4

Open the DNS name of the App LB in a browser. You should be able to see the web page.


Route 53 DNS config
Go to the Route 53 service > Select your hosted zone > Create Record


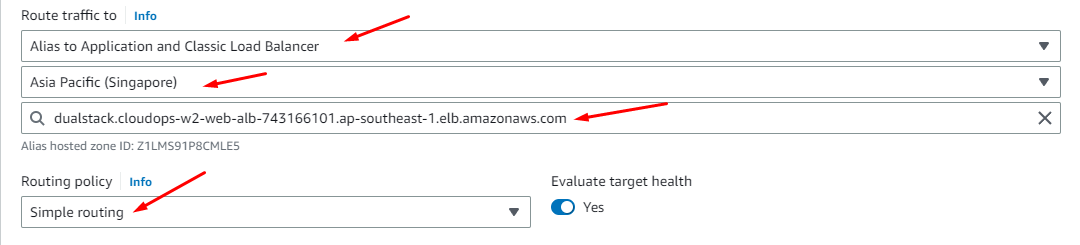
Create Records.
Extras
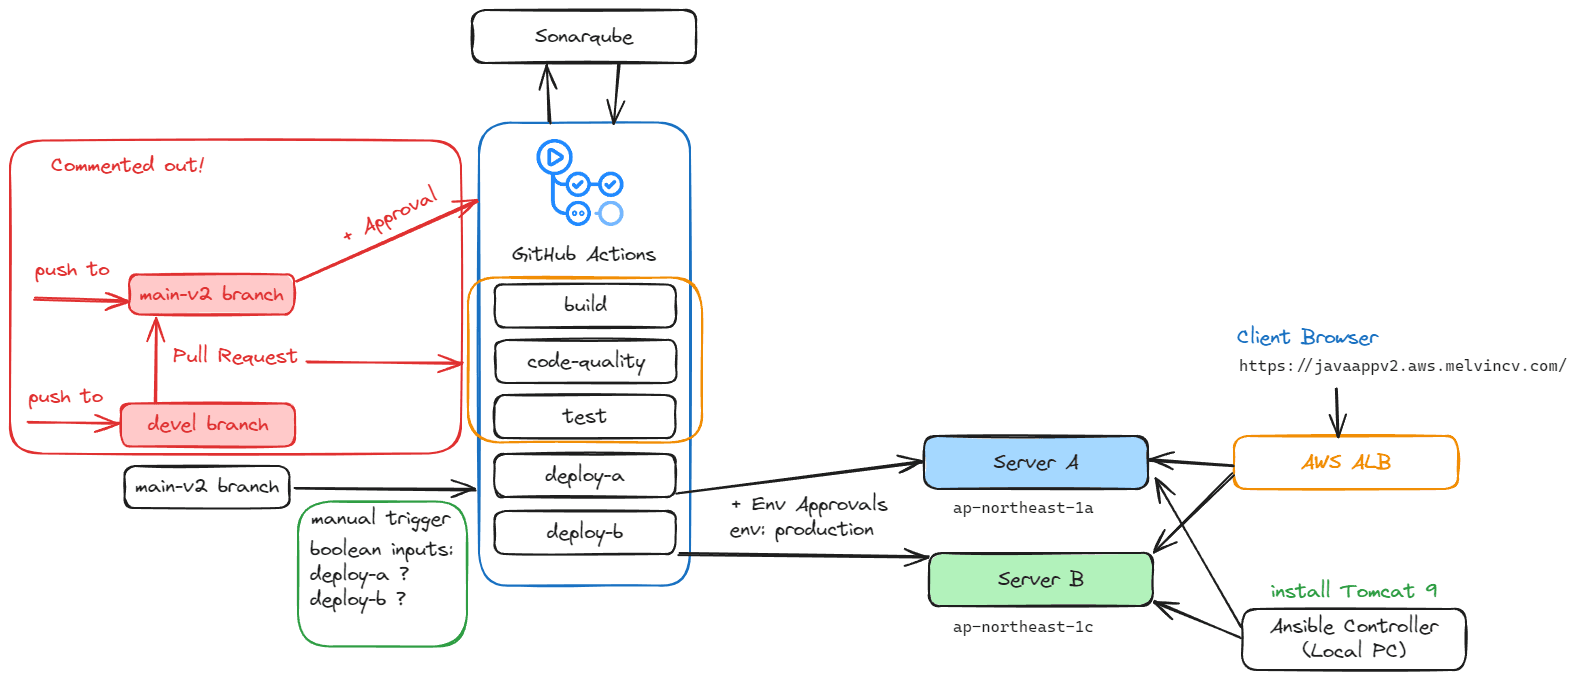
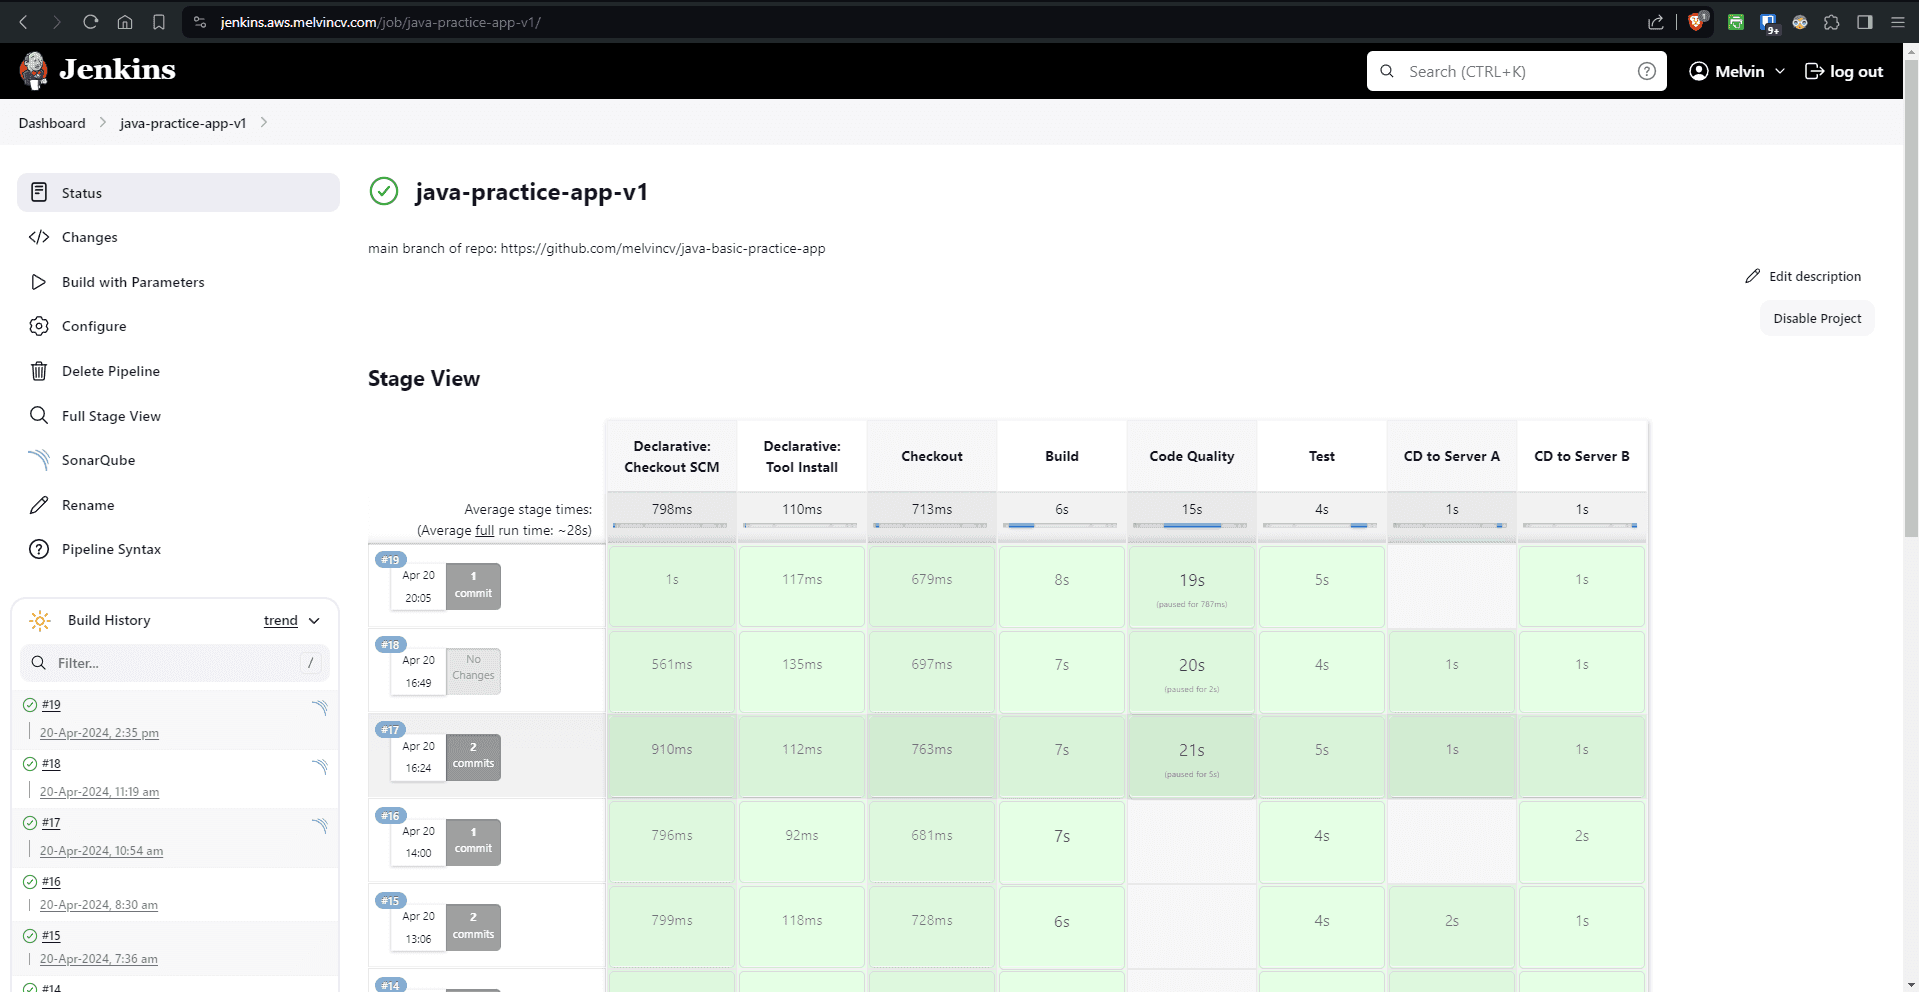
GitHub Actions
I also added a GitHub workflow to deploy the repo code to the S3 bucket, from which newly created instances in the app and web tier get their code. A commit and push to the main branch will trigger the workflow.
name: Deploy App Code to S3

on:
  push:
    branches:
      - main

jobs:
  deploy:
    runs-on: ubuntu-latest
    steps:
    - name: Checkout code
      uses: actions/checkout@v3

    - name: Configure AWS credentials
      uses: aws-actions/configure-aws-credentials@v2
      with:
        aws-access-key-id: ${{ secrets.AWS_ACCESS_KEY_ID }}
        aws-secret-access-key: ${{ secrets.AWS_SECRET_ACCESS_KEY }}
        aws-region: ap-southeast-1

    - name: Sync files to S3
      run: |
        aws s3 sync app-code/ s3://melvincv2023-cloudops-w2
Conclusion
Crafting a highly available 3-tier architecture for a Node.js app in AWS, with a blend of frontend public subnets, backend private subnets, and Aurora DB private subnets, yields a robust and efficient infrastructure.
The frontend layer engages users, the backend layer processes data, and the database layer stores critical information. This harmonious orchestration, combined with AWS's reliability and scalability, culminates in an architecture that can weather the demands of modern applications.
Connect with me on Linkedin and Twitter for more projects! Please find my social links at the top:

Also, consider subscribing to my blog 😊