#10weeksofCloudOps - Week 1
Host a static website on AWS or Azure or GCP and implement CI/CD
I am a DevOps Consultant. 3 years experience with Cloud technologies. 9 years total IT experience in the Linux, Networking and Data Visualization domains. Love listening to music and playing older PC games.

Introduction
In today's digital age, hosting a website has become an essential part of establishing an online presence. Amazon Web Services (AWS) offers a robust and scalable platform for hosting static websites, while implementing Continuous Integration and Continuous Deployment (CI/CD) practices can streamline the development and deployment process.
One popular CI/CD tool is GitHub Actions, which allows developers to automate various tasks. In this article, we will explore how to host a static website on AWS and implement CI/CD using GitHub Actions, enabling you to efficiently manage and deploy your website with ease.
Resources
Use S3, CloudFront, Route53
https://docs.aws.amazon.com/AmazonS3/latest/userguide/HostingWebsiteOnS3Setup.html
https://docs.aws.amazon.com/AmazonS3/latest/userguide/website-hosting-cloudfront-walkthrough.html
Architecture

(Unavailable, as the infrastructure has been torn down)
Procedure
Download a static site and add it to a new Github repo. (under the www folder)
Create an S3 bucket


Click: Create Bucket
Enable Static Website hosting


Click: Save Changes
Copy the Public URL from the bottom of the Properties page.

Install and configure the AWS CLI for your OS.
https://docs.aws.amazon.com/cli/latest/userguide/getting-started-install.html
Create an AWS Access Key and Secret Key.
Configure AWS CLI:
aws configure
Copy the static site to the s3 bucket:
aws s3 cp www s3://melvincv2023-cloudops-w1 --recursive

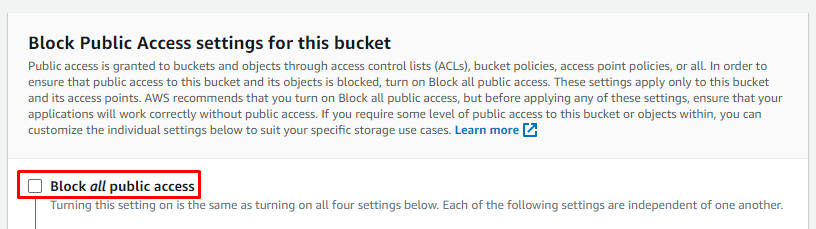
Add an S3 Bucket Policy to allow public access


{
    "Version": "2012-10-17",
    "Statement": [
        {
            "Sid": "PublicReadGetObject",
            "Effect": "Allow",
            "Principal": "*",
            "Action": [
                "s3:GetObject"
            ],
            "Resource": [
                "arn:aws:s3:::melvincv2023-cloudops-w1/*"
            ]
        }
    ]
}
Add the above policy and click Save Changes.
Now the Bucket URL should load the static site:
http://melvincv2023-cloudops-w1.s3-website-ap-southeast-1.amazonaws.com/
CloudFront
Go to the Cloudfront service, click "Create distribution".
Enter the Amazon S3 website endpoint for your bucket. Do not select the default bucket URI from the dropdown.

For Default Cache Behavior Settings, keep the values set to the defaults.


Go to the Certificate Manager service > Create an SSL certificate > Verify the certificate by adding records to Route 53 (or your domain registrar's DNS settings)
Select the certificate in CloudFront. I have already created an wildcard SSL certificate in Certificate Manager.


Click: Create distribution.
Create an S3 bucket in the Singapore region for configuring Cloudfront logging:
aws s3 mb s3://melvincv2023-cloudops-w1-logs --region ap-southeast-1
Configure CloudFront logging:

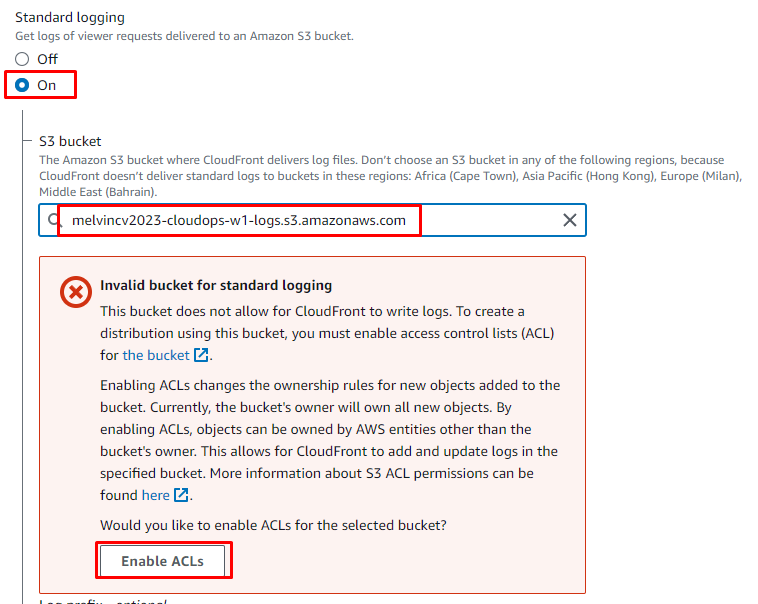
Click: Save changes.
Go to Route 53 > select your zone
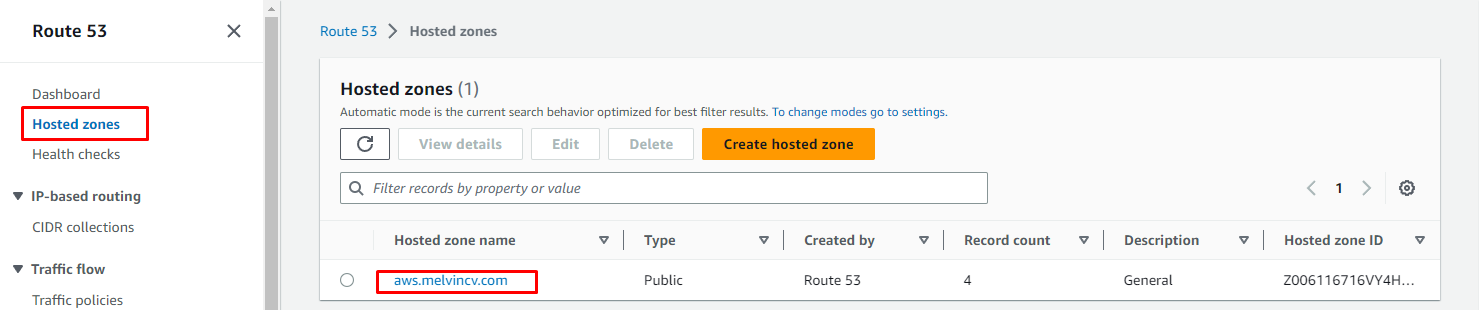
Add an Alias record pointing to your CloudFront distribution.

Click: Create records.
The site is now accessible at:
Dimension by HTML5 UP (melvincv.com)
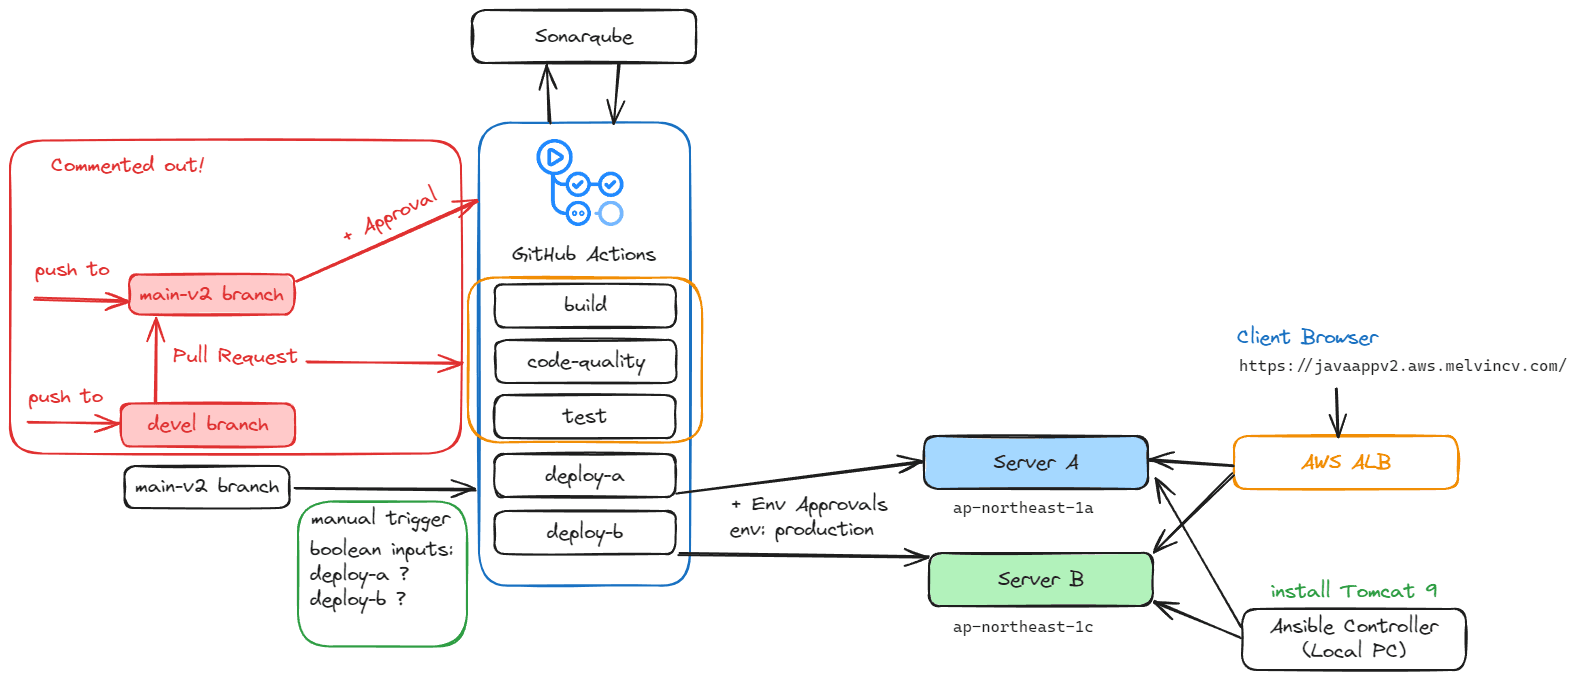
GitHub Actions Workflow
GitHub Actions workflows are a powerful tool for automating various tasks in the software development lifecycle. Workflows are defined in YAML files and can be triggered by events such as code pushes, pull requests, or scheduled intervals.
Workflows consist of one or more jobs, which are executed on virtual machines or containers. Each job can have multiple steps, which are individual tasks that can be executed sequentially or in parallel. Workflows can also use actions, which are reusable units of code that can be shared and used across different workflows.
With GitHub Actions workflows, developers can automate tasks such as building, testing, and deploying their code, enabling them to focus on writing high-quality software.
Add repo secrets
Create an IAM user with programmatic access and download the credentials.csv file


Next > Create Access Key > Download CSV file

Create 2 secrets, add the access key and secret access key as their values:
AWS_ACCESS_KEY_ID
AWS_SECRET_ACCESS_KEY

Github Workflow
Create a file in the repo in the path .github/workflows/deploy.yml
name: Deploy Static Site to S3

on:
  push:
    branches:
      - main

jobs:
  deploy:
    runs-on: ubuntu-latest

    steps:
      - name: Checkout code
        uses: actions/checkout@v3

      - name: Set up AWS credentials
        uses: aws-actions/configure-aws-credentials@v2
        with:
          aws-access-key-id: ${{ secrets.AWS_ACCESS_KEY_ID }}
          aws-secret-access-key: ${{ secrets.AWS_SECRET_ACCESS_KEY }}
          aws-region: ap-southeast-1

      - name: Deploy to S3
        run: |
          aws s3 sync www s3://melvincv2023-cloudops-w1 --delete

      - name: Invalidate CloudFront cache
        run: |
          aws cloudfront create-invalidation --distribution-id E12J9I3XUIQBDB --paths "/*"
Create an Origin Access?
No, it is not possible to use Origin Access Control (OAC) with an S3 website endpoint. When your origin is an Amazon S3 bucket configured as a website endpoint, you cannot use OAC or OAI (Origin Access Identity) [1].
However, you can still restrict access to a custom origin by setting up custom headers and configuring the origin to require them [1]. This means you can implement additional measures to control access to your S3 bucket content when using an S3 website endpoint with CloudFront.
It is important to note that using OAI is a best practice for securing access to your S3 bucket content through CloudFront[2][4]. While it may not apply to an S3 website endpoint, you can explore other options like custom headers to enhance the security of your static website hosted on S3.
Citations:
[2] https://trendmicro.com/cloudoneconformity/knowledge-base/aws/CloudFront/s3-origin.html
[3] https://repost.aws/knowledge-center/cloudfront-serve-static-website
[4] https://www.stormit.cloud/blog/cloudfront-origin-access-identity/
[6] https://think-devops.com/posts/static-website-hosting/
Conclusion
Hosting a static website on AWS and implementing CI/CD using GitHub Actions can greatly enhance your web development workflow. By leveraging the power of AWS services like Amazon S3 and CloudFront, you can ensure high availability, scalability, and cost-effectiveness for your website.
Additionally, integrating CI/CD practices with GitHub Actions enables you to automate the deployment process, ensuring that your website is always up-to-date with the latest changes. This combination of AWS and GitHub Actions empowers developers to focus on building and improving their websites, while the infrastructure and deployment processes are taken care of seamlessly.
So, whether you are a seasoned developer or just starting your journey, hosting a static website on AWS and implementing CI/CD using GitHub Actions is a valuable skill set to have in your toolkit. Embrace the power of these technologies and take your web development projects to new heights.